> For the complete documentation index, see [llms.txt](https://docs.ibexa.ai/llms.txt). Markdown versions of documentation pages are available by appending `.md` to page URLs; this page is available as [Markdown](https://docs.ibexa.ai/manual/agents.md).

# Agents

This guide explains how to create, configure, test, and manage AI agents on the Ibexa Agentic Marketing Platform. Agents are AI-powered assistants that can be given instructions, connected to tools, triggered automatically, and used to answer questions or generate reports for your organisation. You can create an agent from scratch or start from a pre-built catalog entry via the Agents Browser.

## Before You Begin

* Any member can view and create agents.
* Editing or deleting an agent requires being the agent's **creator**, or having **Owner** or **Administrator** permissions.

## The Agents Page

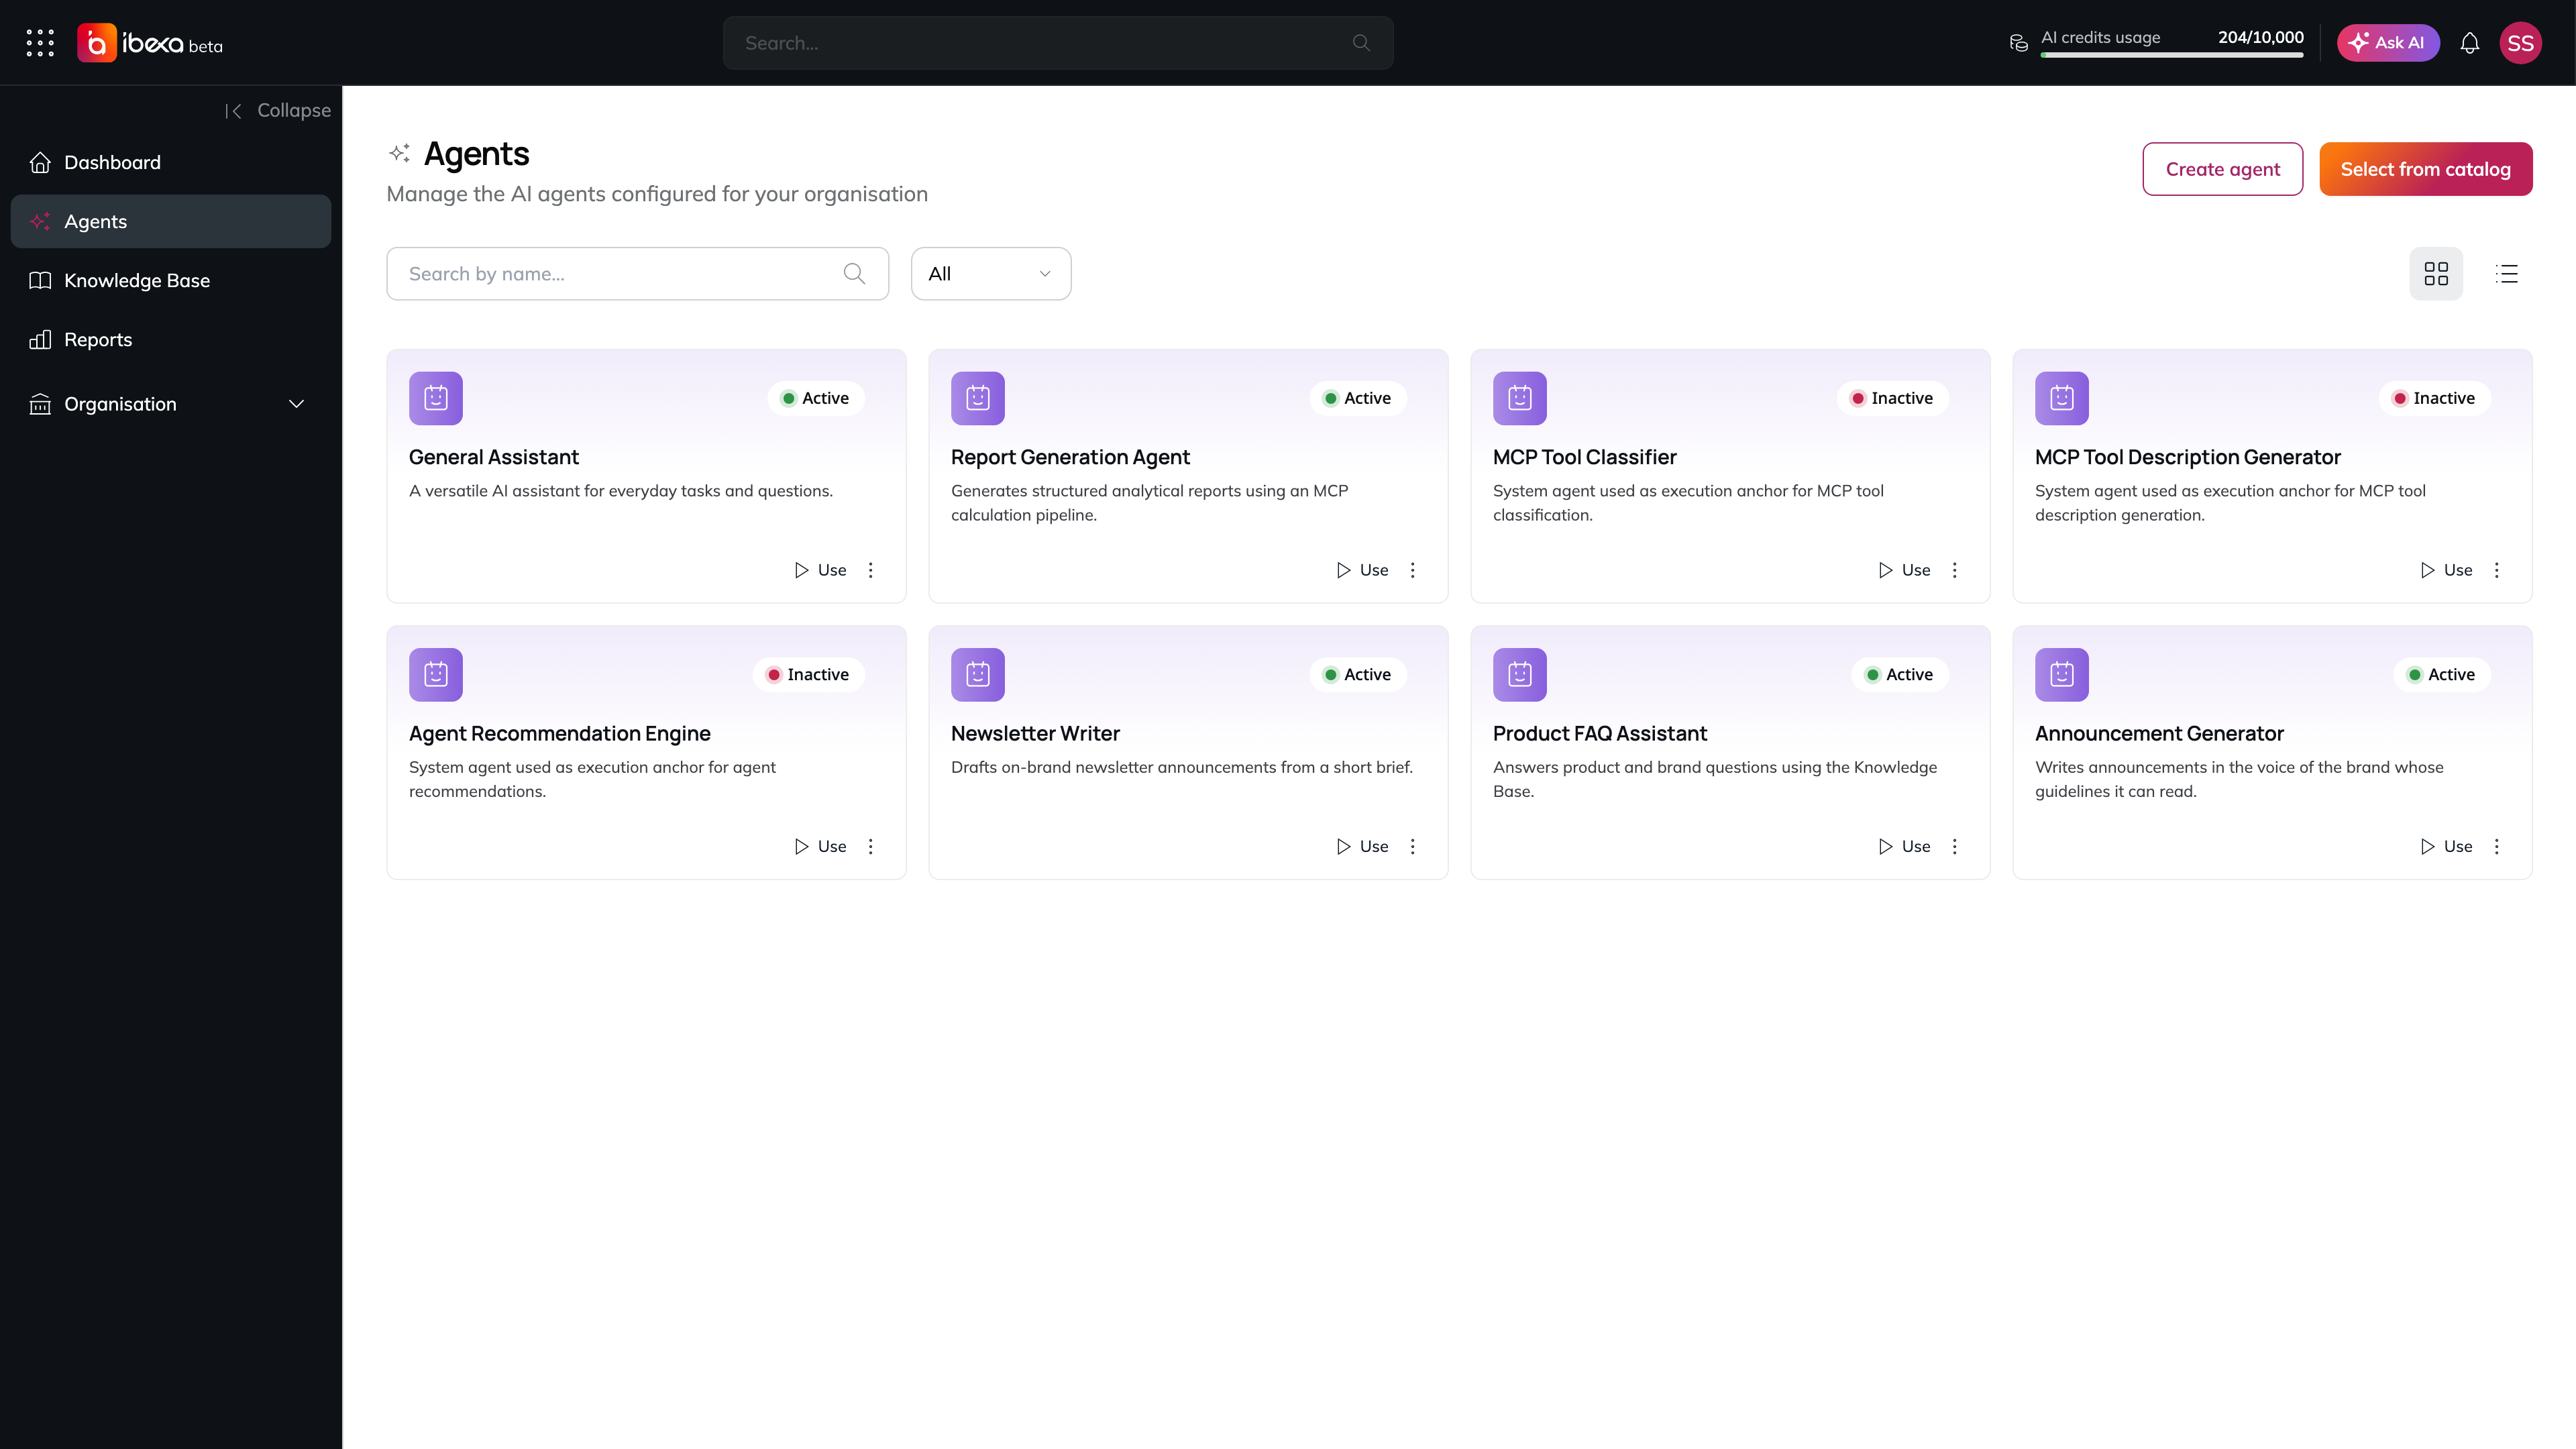
In the main menu, go to **Agents**. The page shows all agents in your organisation. You can switch between a **list view** and a **grid view** using the view toggle in the toolbar. Each agent card or row shows the agent's name, status (**Enabled** / **Disabled**), and available actions.

<figure><img src="https://3641047820-files.gitbook.io/~/files/v0/b/gitbook-x-prod.appspot.com/o/spaces%2Fzi8TZ3KjOFqUxK0zOIrL%2Fuploads%2Fgit-blob-563874a325b2c3cec87409f7cbfae84c26d723a5%2Fagents-page.png?alt=media" alt="The Agents page in grid view with a search box, a status filter, the grid and list view toggle, the Create agent and Select from catalog buttons, and agent cards showing each agent name, description, Active or Inactive status and a Use button"><figcaption><p>The Agents page in grid view</p></figcaption></figure>

## Browsing the Agent Catalog

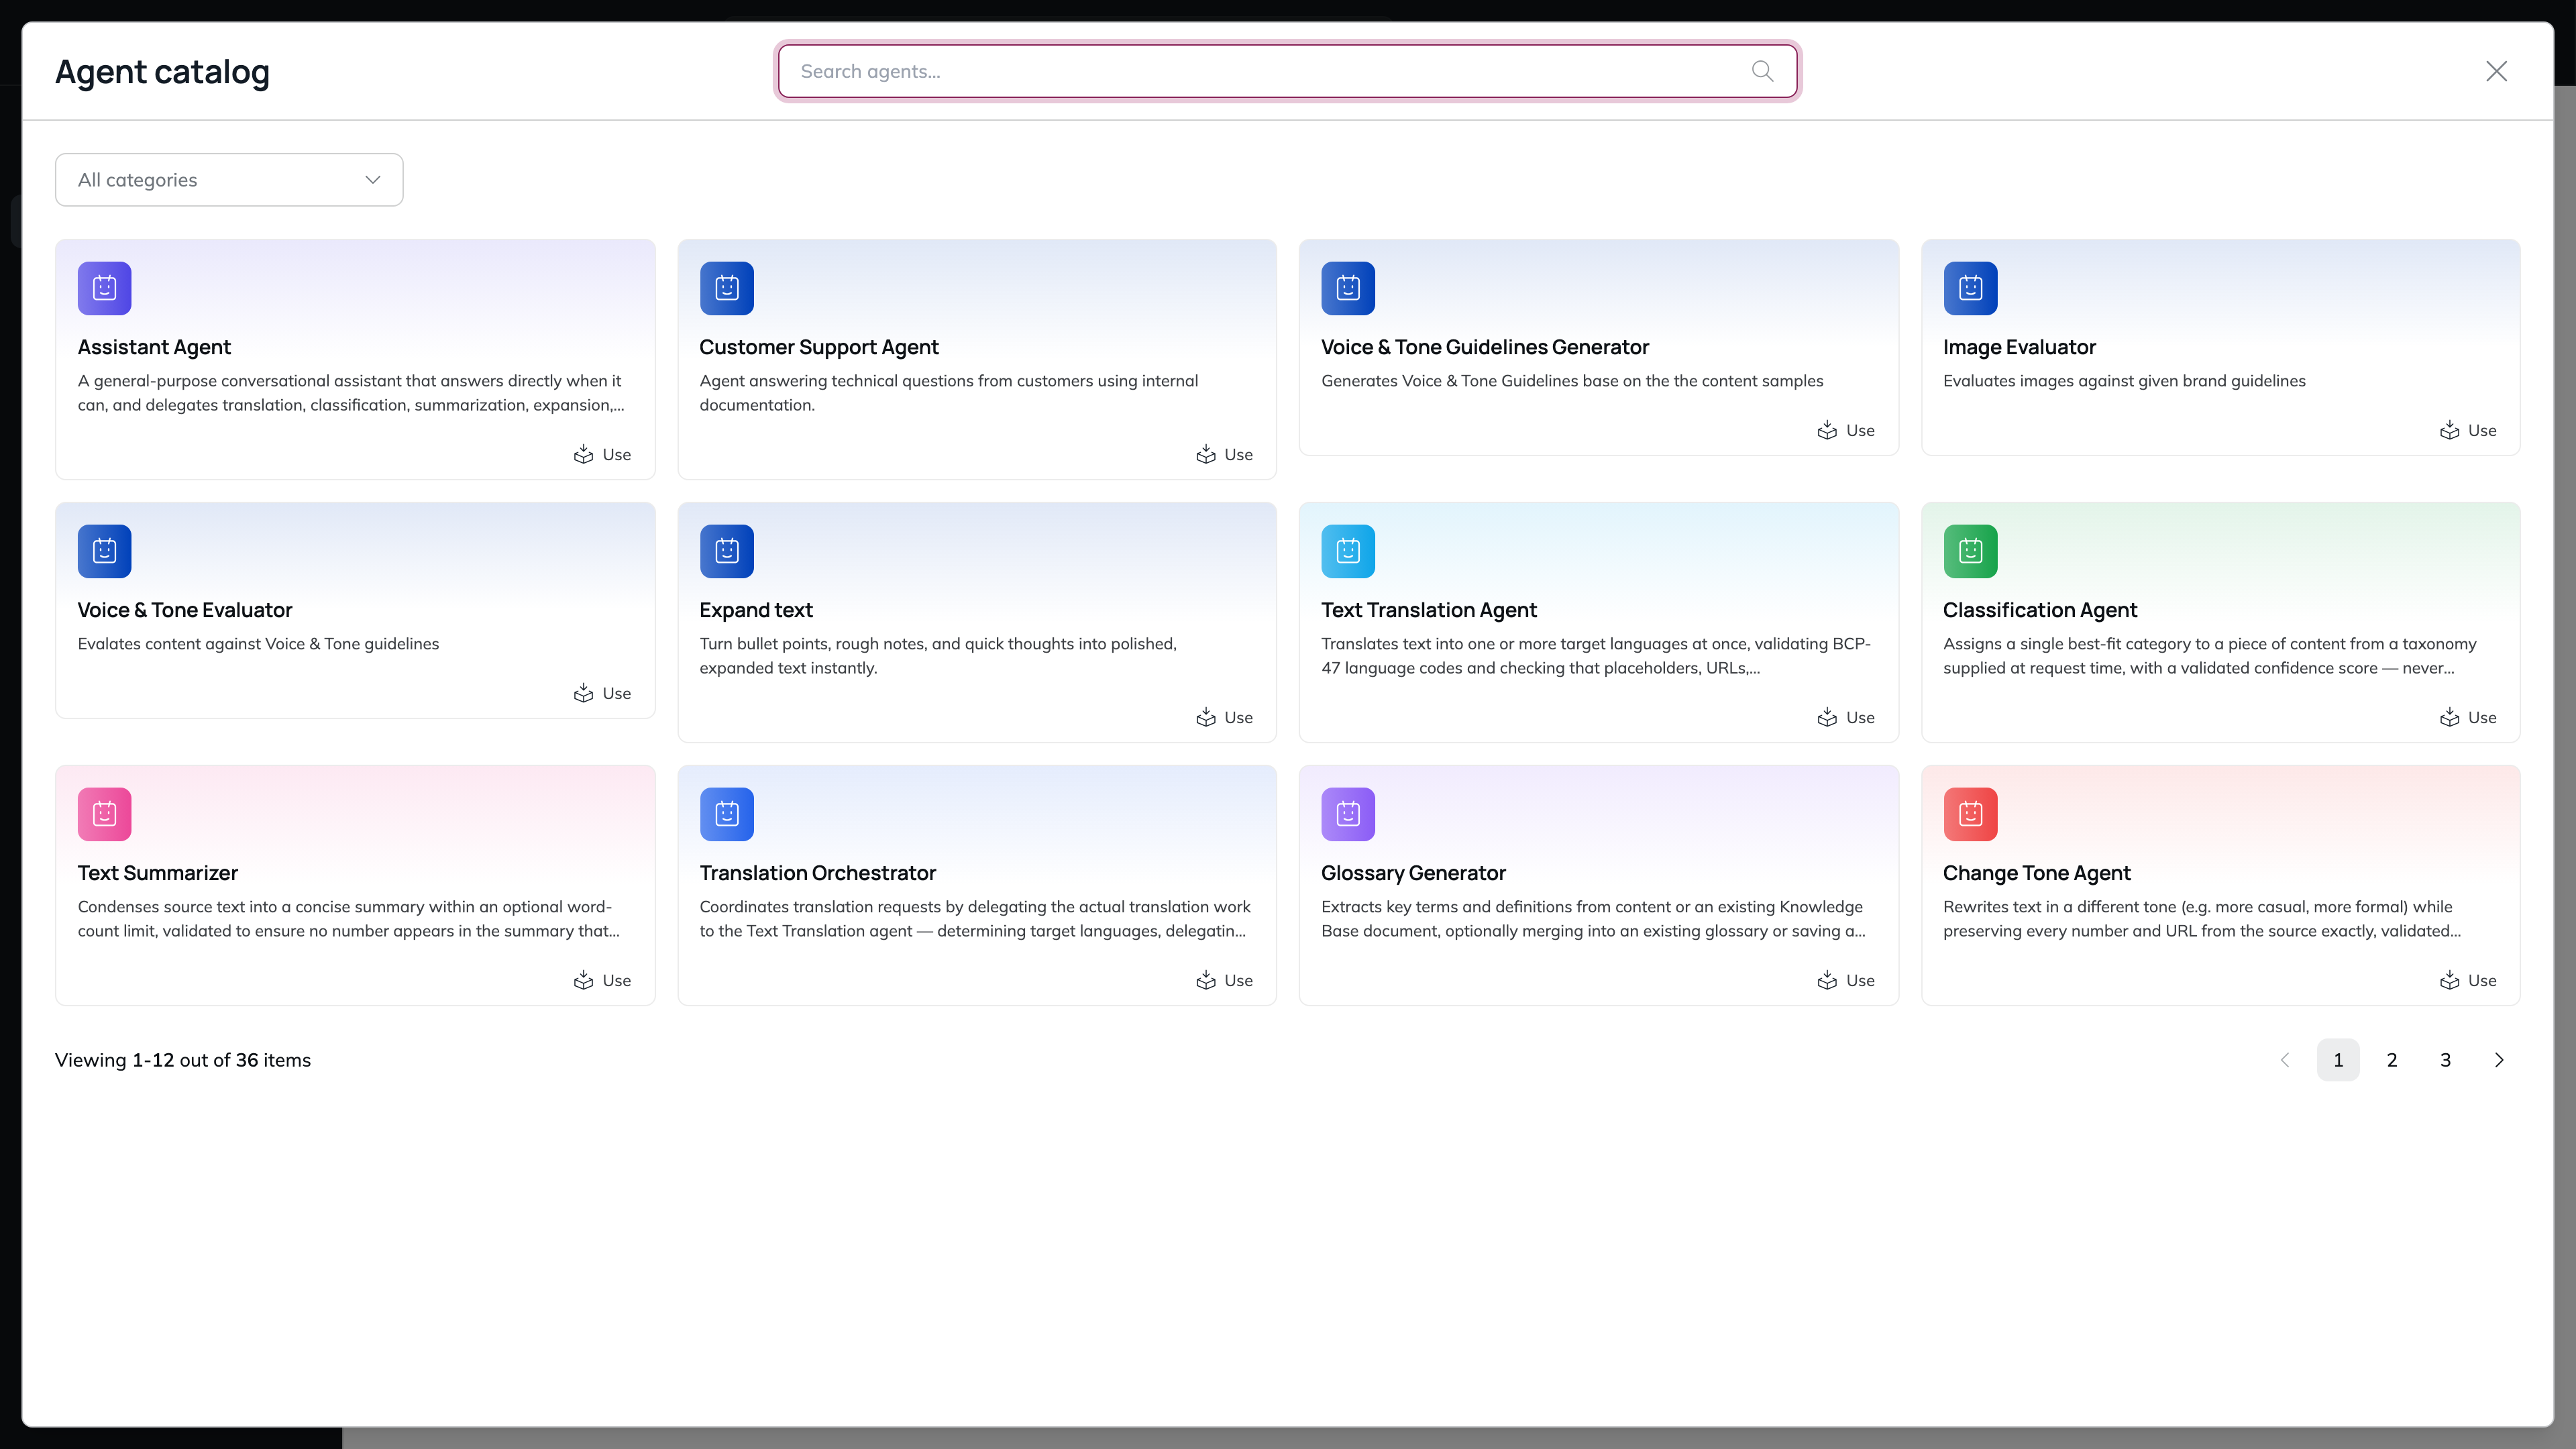
Selecting **Add Agent** on the Agents page takes you to the **Agents Browser** - a curated catalog of pre-built agents for popular use-cases that you can enable with a single click, maintained by your platform administrator.

<figure><img src="https://3641047820-files.gitbook.io/~/files/v0/b/gitbook-x-prod.appspot.com/o/spaces%2Fzi8TZ3KjOFqUxK0zOIrL%2Fuploads%2Fgit-blob-ac46b117a79d5944f65b5299cf59fd9046f35092%2Fagent-catalog.png?alt=media" alt="The Agent catalog dialog with a search box, the All categories filter, a grid of catalog agent cards each with a Use button, and pagination at the bottom"><figcaption><p>The Agent catalog</p></figcaption></figure>

### 1. Browse or search the catalog

Use the **search box** to find an agent by name, or the **category filter** (default: **All categories**) to narrow the list down to a specific category. If no agents match your search or filters, the message *"No agents match your filters."* is shown.

### 2. Preview a catalog entry (optional)

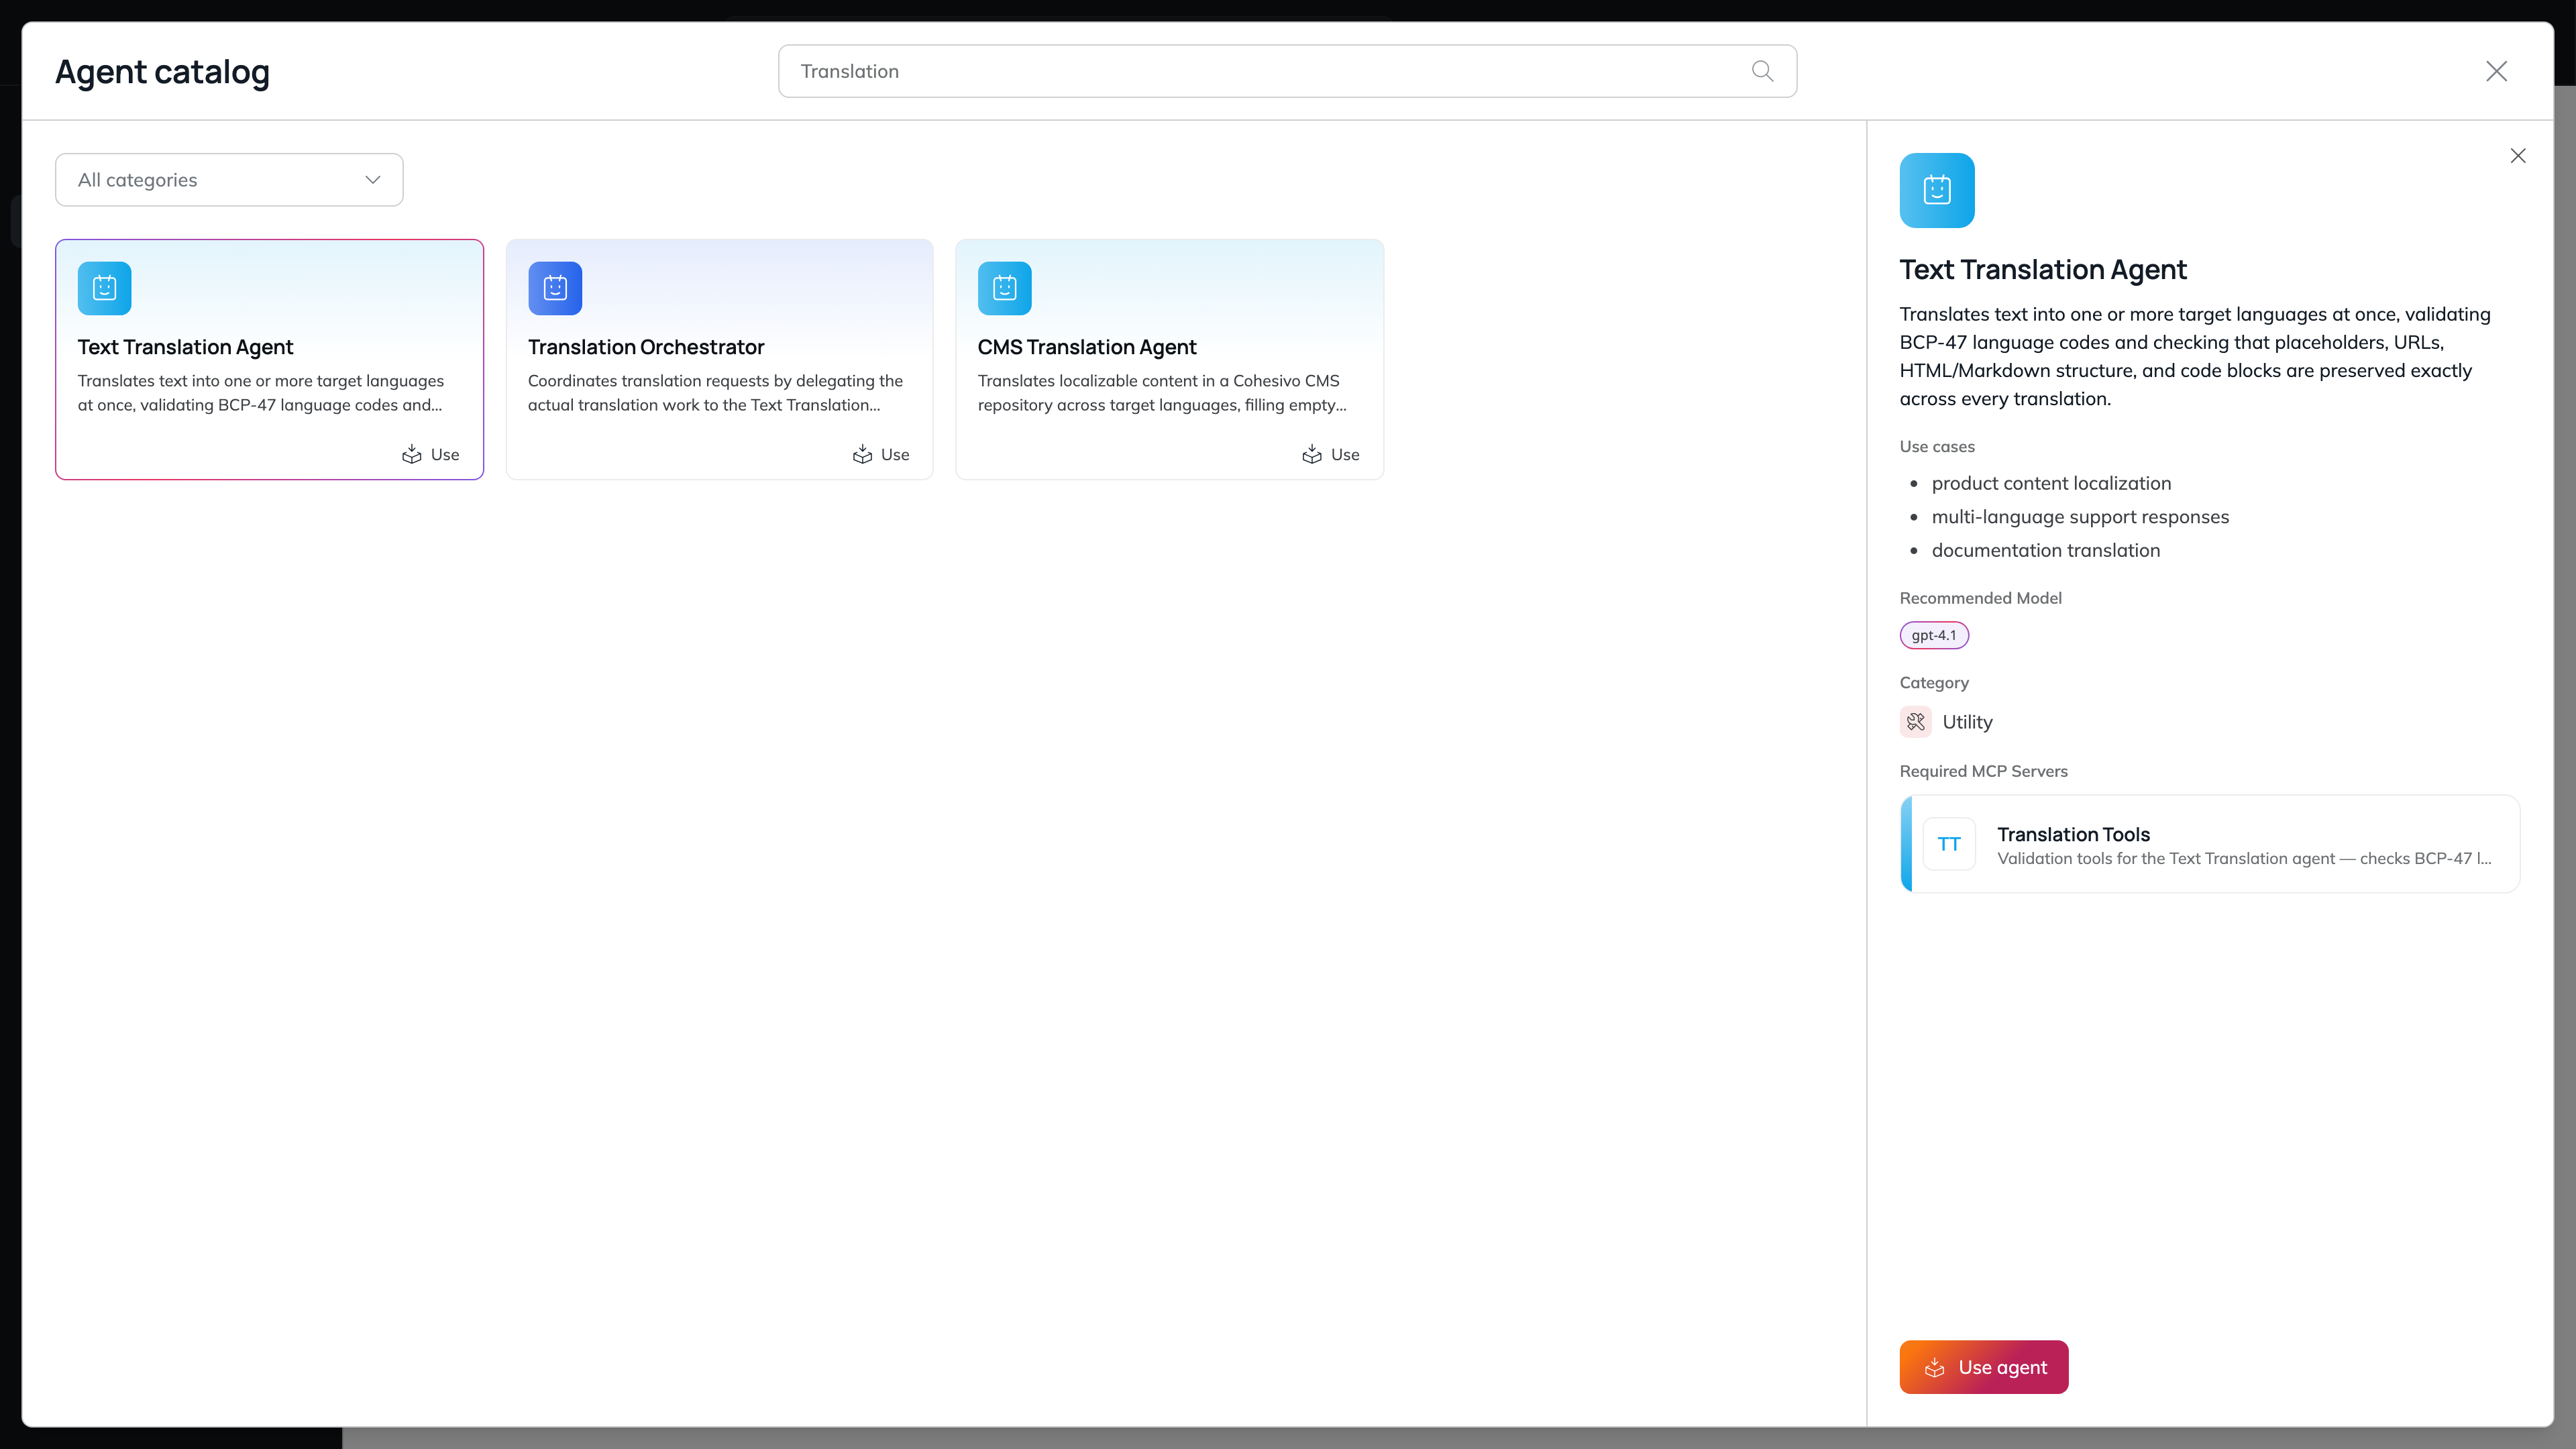
Select a catalog agent's card to open a detail panel with more information: its description, **Use cases**, **Recommended Model(s)**, **Category**, how many times it has been used, and its **Required MCP Servers** (the tools the agent needs to work).

<figure><img src="https://3641047820-files.gitbook.io/~/files/v0/b/gitbook-x-prod.appspot.com/o/spaces%2Fzi8TZ3KjOFqUxK0zOIrL%2Fuploads%2Fgit-blob-ad693e7edbef75aa1bae43c74cc697249ec0c625%2Fagent-catalog-entry.png?alt=media" alt="The Agent catalog filtered by Translation, with the Text Translation Agent entry selected and its detail sheet open on the right, showing the description, the use cases, the recommended model, the Utility category, the required Translation Tools MCP server and the Use agent button"><figcaption><p>Detail sheet of a catalog entry</p></figcaption></figure>

### 3. Use the agent

Select **Use** on the agent's card (or **Use agent** in the detail panel). You are taken to the **Add Agent** page (see below), pre-filled with the catalog entry's name, description, and instructions - review and adjust them as needed before submitting.

### Adding a custom agent instead

If you don't want to start from the catalog, select **Add Custom Agent** at the top of the **Agents Browser** page to open a blank **Add Agent** page.

## Creating an Agent

### 1. Open the Add Agent page

Open the **Add Agent** page either by selecting **Use** on a catalog entry in the [Agents Browser](#browsing-the-agent-catalog) (which pre-fills the fields below), or by selecting **Add Custom Agent** there to start from scratch. The Add Agent page opens with a six-step wizard at the top showing your progress.

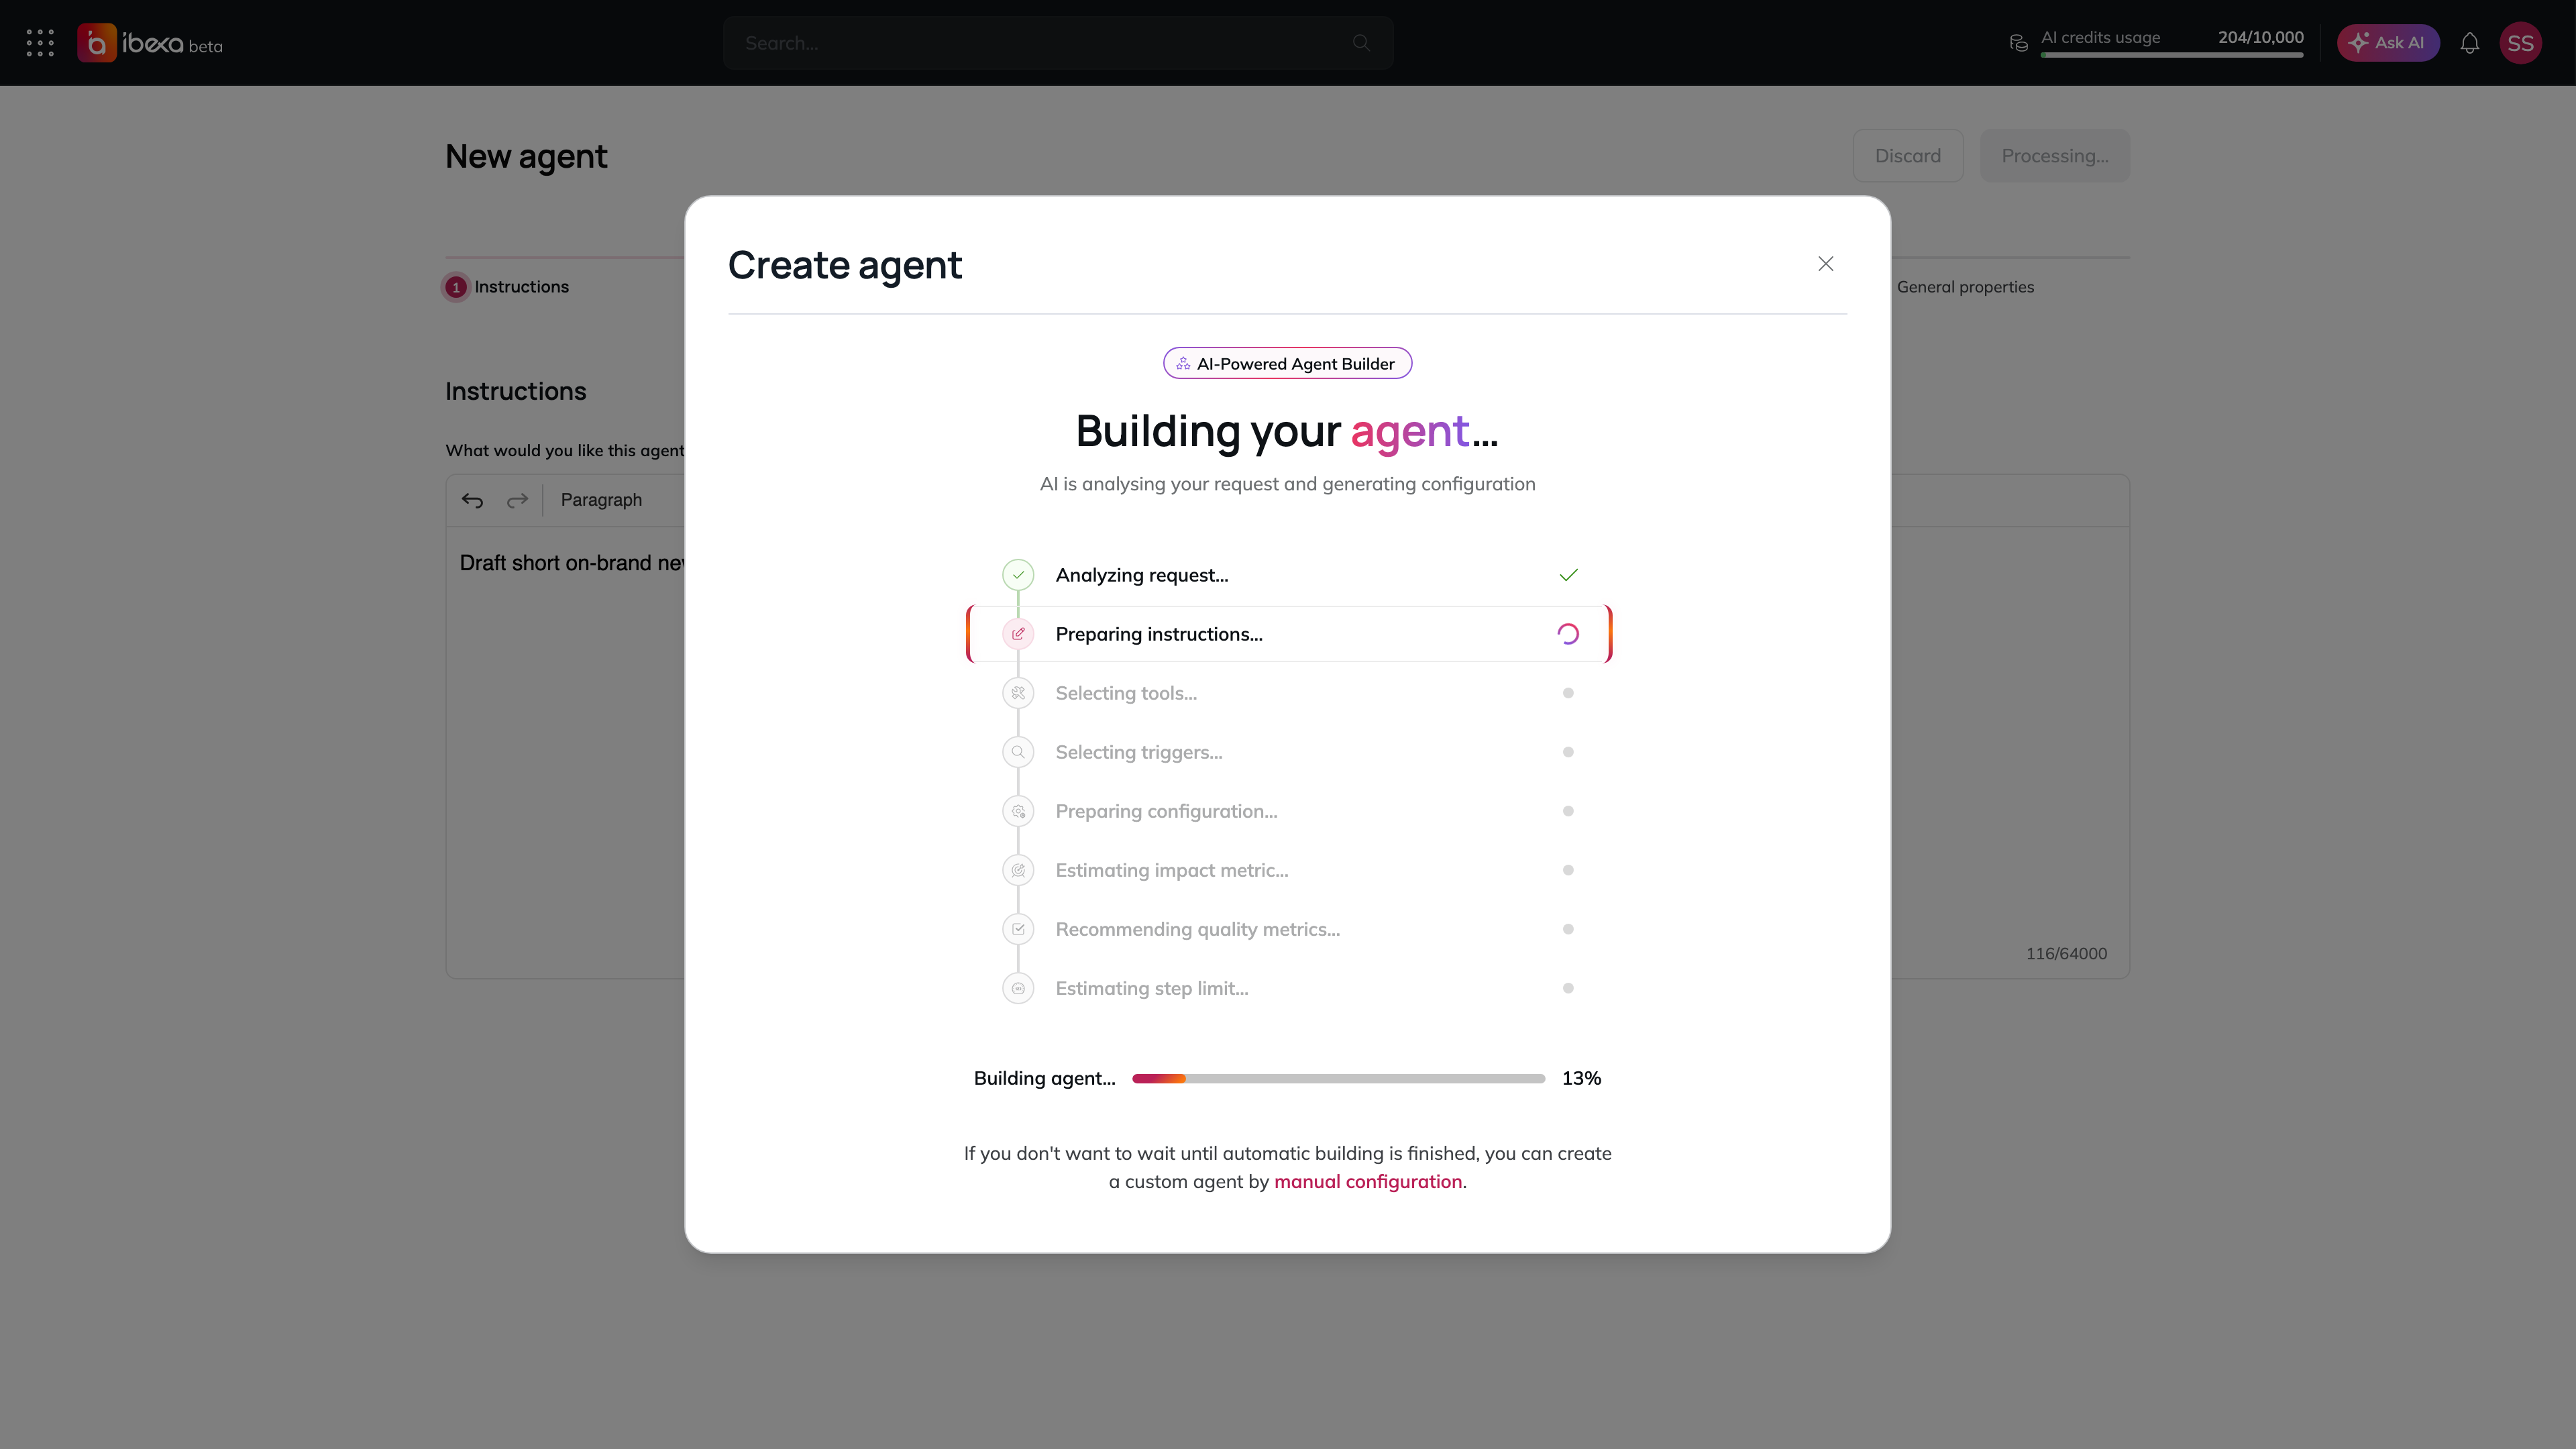
> **AI-assisted setup:** After you enter your instructions in Step 1, the platform analyses them and automatically suggests a name, identifier, description, and recommended tools. You can review and adjust these suggestions in the following steps. If you prefer to skip this and configure everything yourself, select **Configure manually** when the *"Create agent"* dialog (badged **AI-Powered Agent Builder**) appears.

<figure><img src="https://3641047820-files.gitbook.io/~/files/v0/b/gitbook-x-prod.appspot.com/o/spaces%2Fzi8TZ3KjOFqUxK0zOIrL%2Fuploads%2Fgit-blob-b0fc6c7119897ef459ddbf6e3501db9b79958b30%2Fagent-wizard-ai-setup.png?alt=media" alt="The Create agent dialog titled Building your agent, with the progress list from Analyzing request to Estimating step limit, a Building agent progress bar and the manual configuration link at the bottom"><figcaption><p>The AI-assisted setup dialog</p></figcaption></figure>

### Step 1: Instructions *(required)*

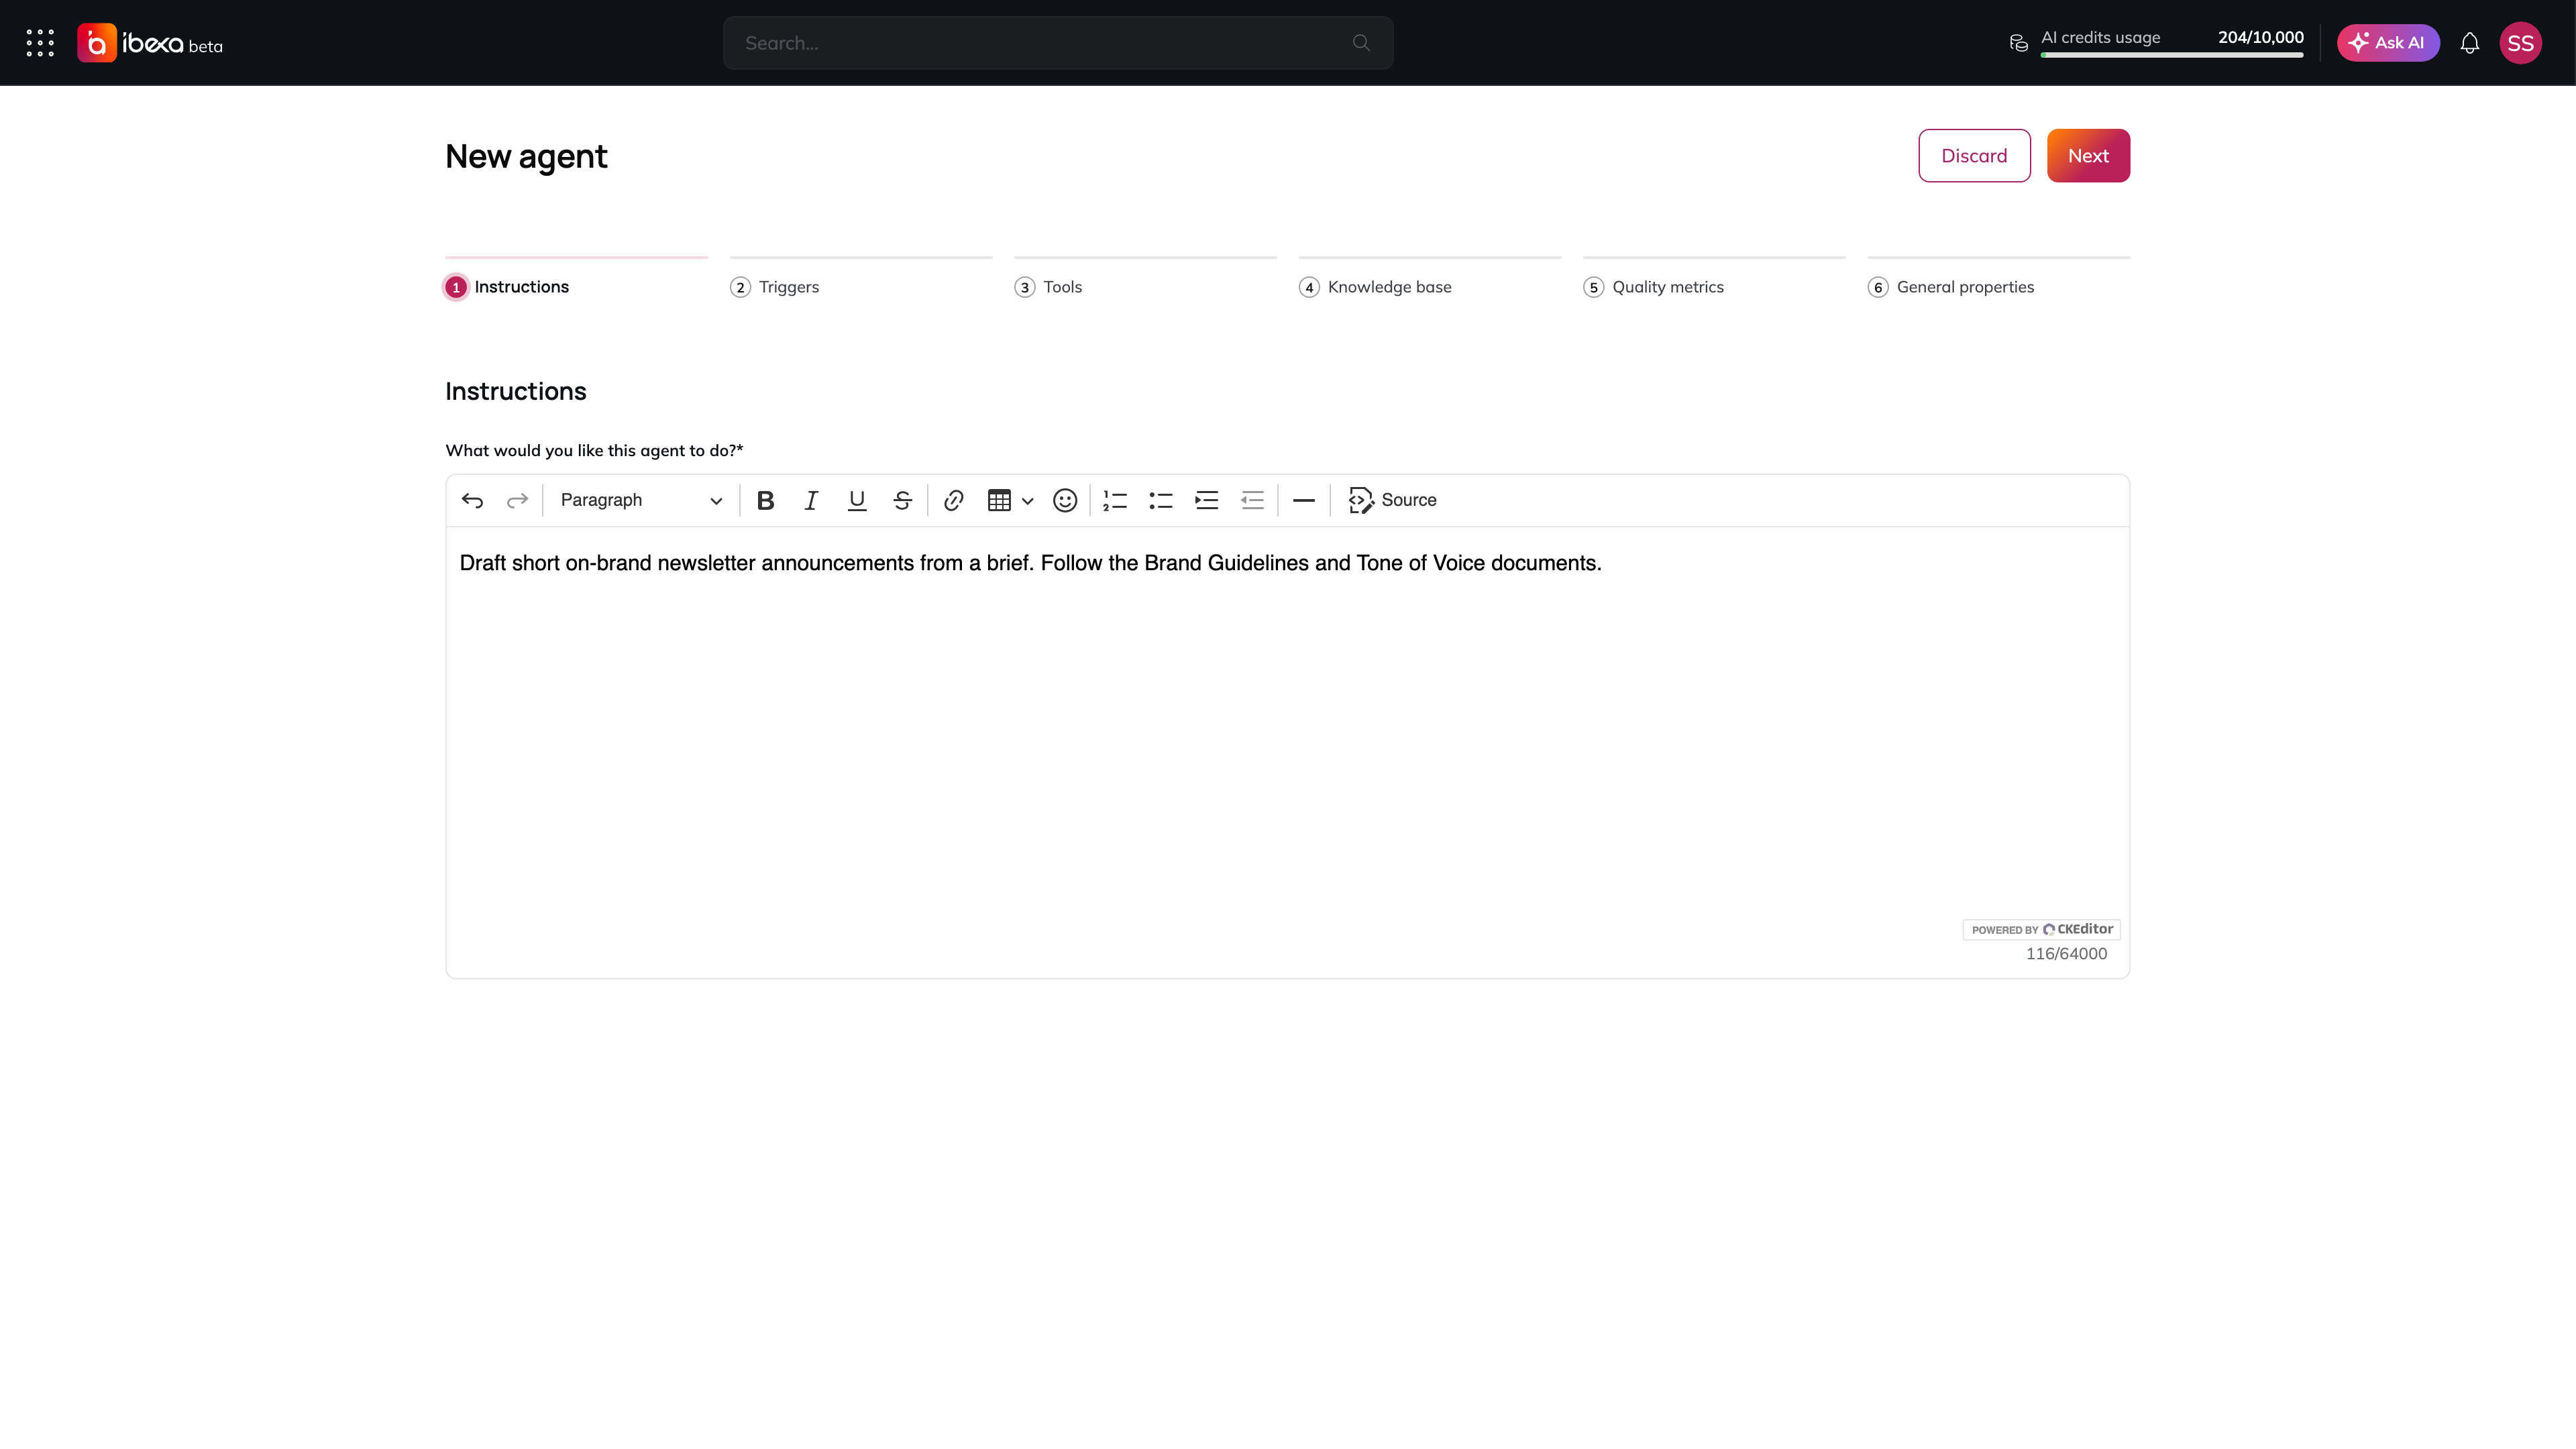
Enter the **Instructions** for your agent - a description of what the agent should do, how it should behave, and what tasks it should focus on. This is the most important field; it defines the agent's purpose. The instructions field accepts free-form text up to 64,000 characters. Select **Next** to continue. The platform will analyse your instructions and pre-fill the following steps.

For practical guidance on writing clear agent instructions, see [Instructions](/manual/agents/instructions.md).

<figure><img src="https://3641047820-files.gitbook.io/~/files/v0/b/gitbook-x-prod.appspot.com/o/spaces%2Fzi8TZ3KjOFqUxK0zOIrL%2Fuploads%2Fgit-blob-363b2da87d65f3535c4cb65dc2abe91f33848997%2Fagent-wizard-instructions.png?alt=media" alt="Step 1 Instructions of the New agent wizard with the six-step stepper and a short instruction typed into the What would you like this agent to do field, which has a rich-text toolbar and a character counter"><figcaption><p>Step 1: Instructions</p></figcaption></figure>

### Step 2: Triggers

Triggers define when the agent runs automatically, without a user manually starting it. To add a trigger:

1. Select **Add trigger**.
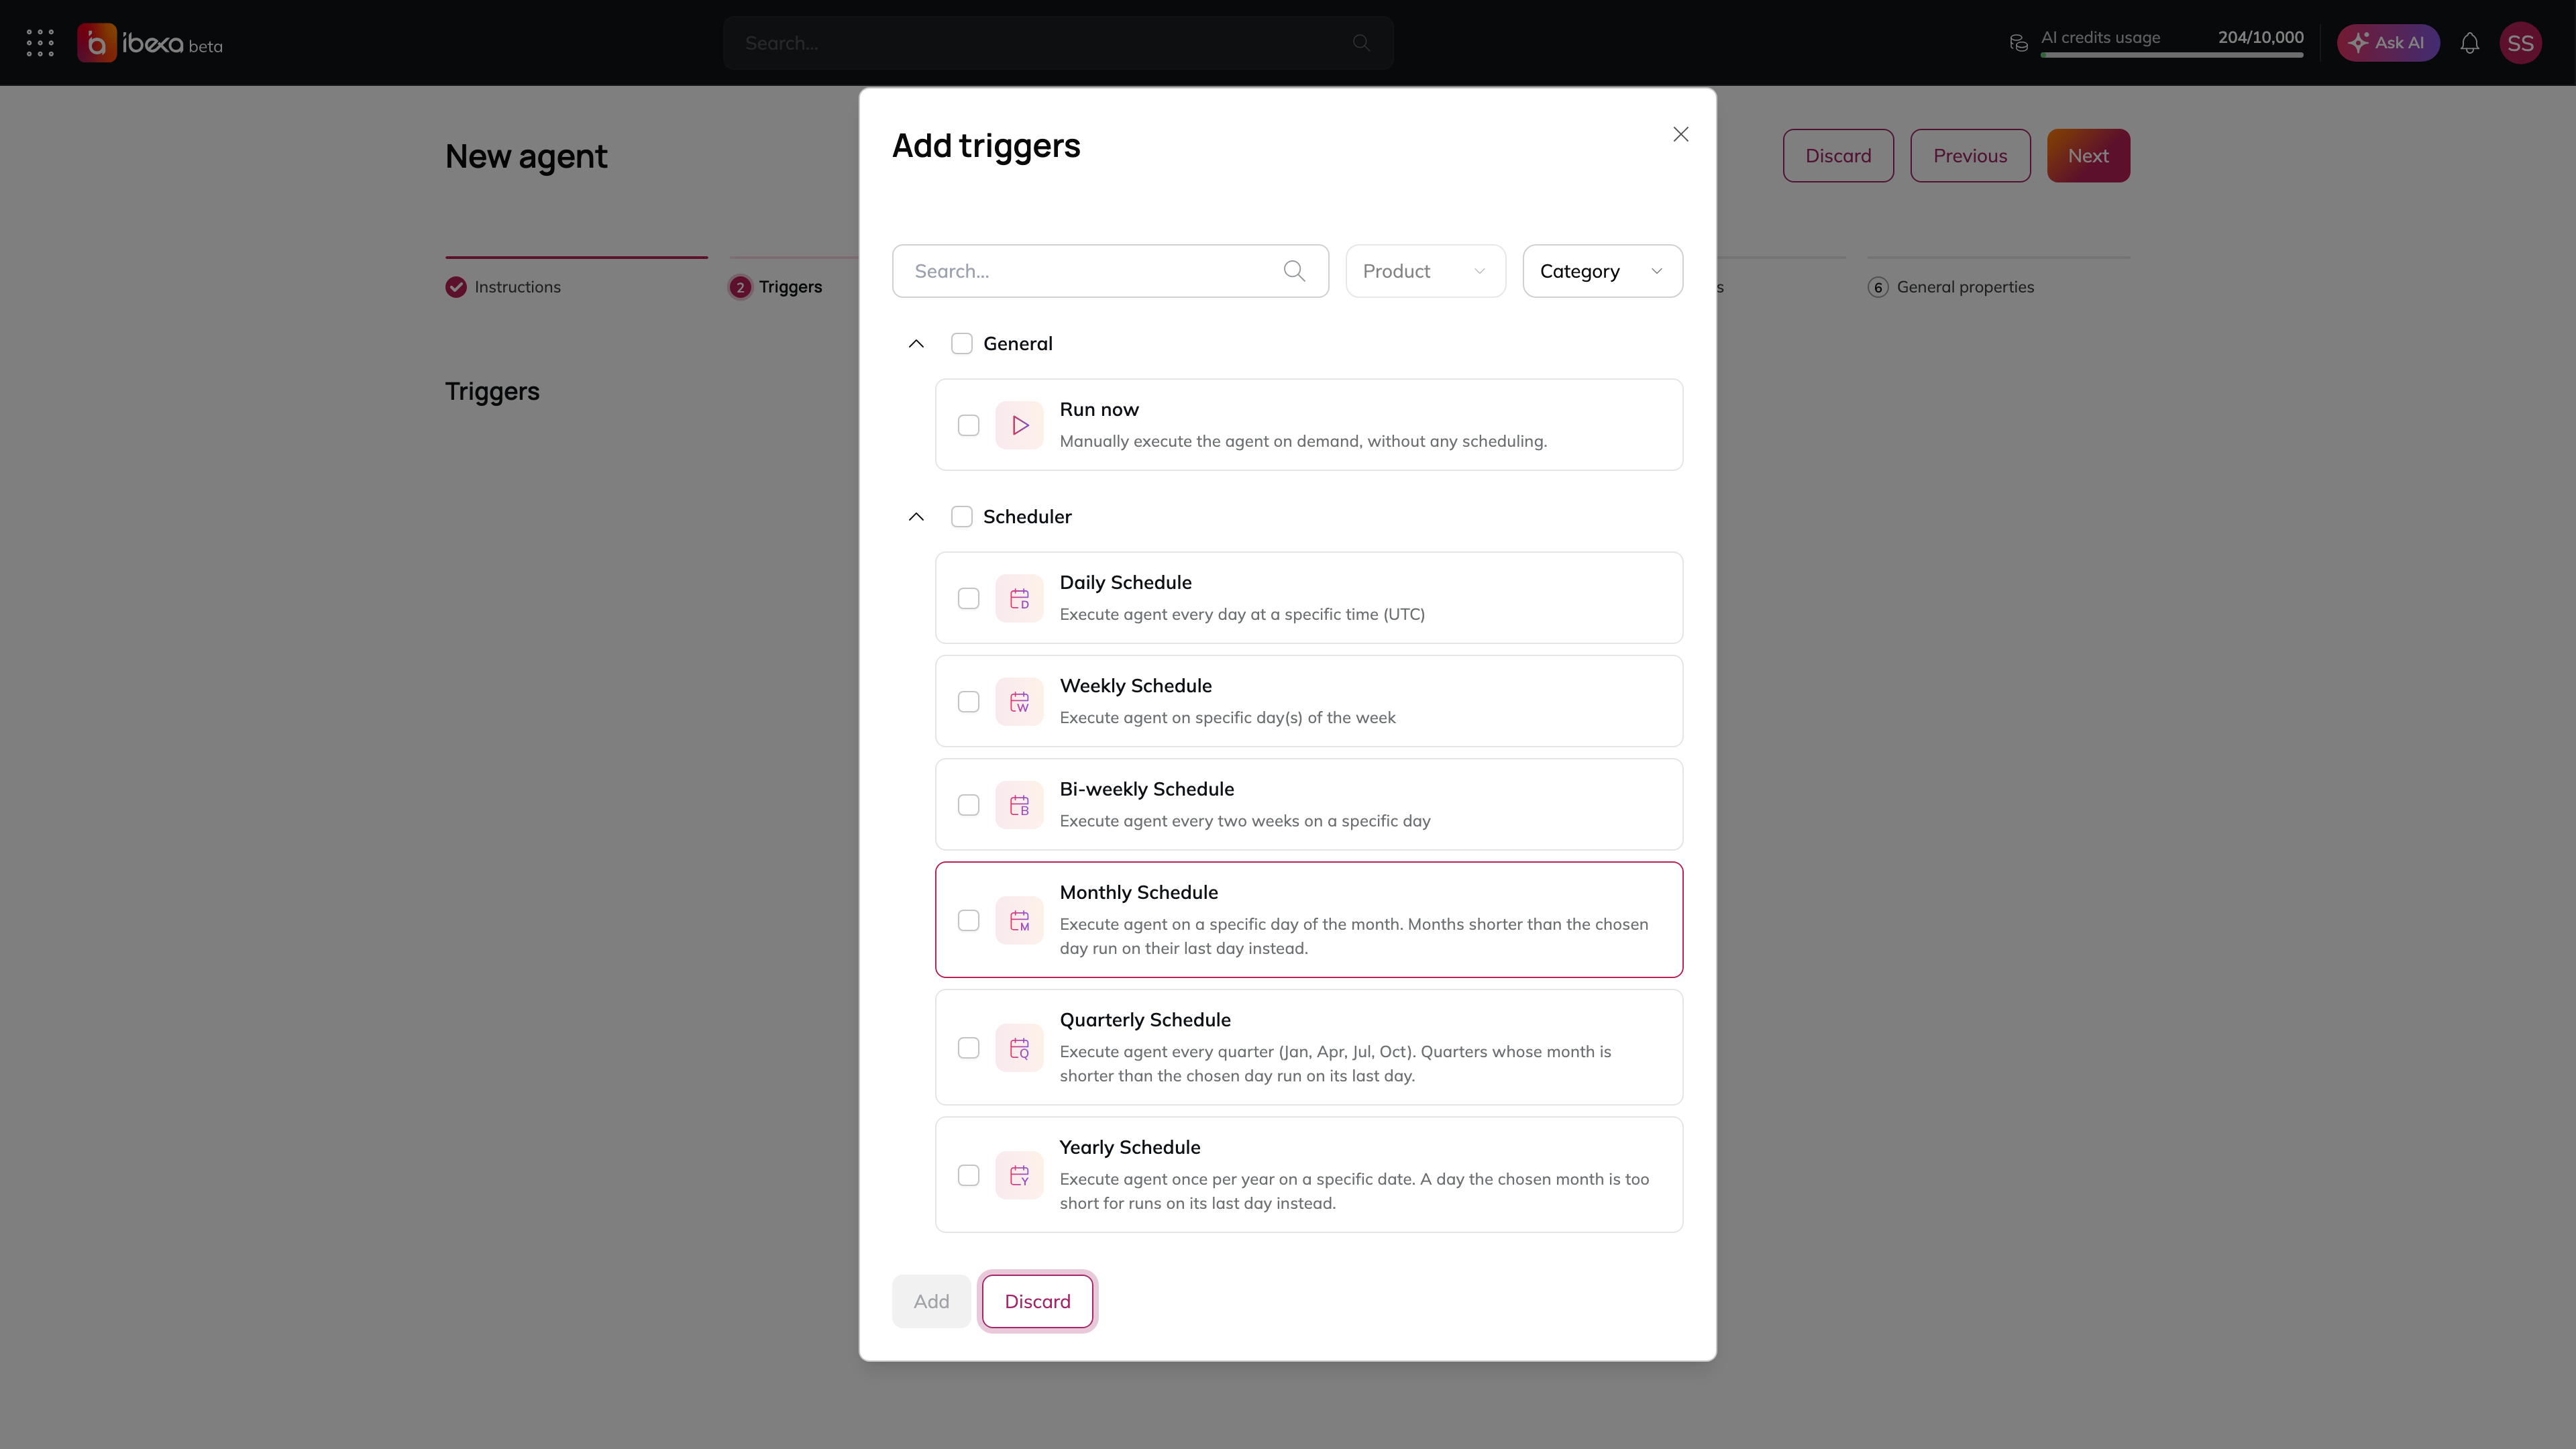
2. Choose a trigger type from the available options (e.g. **Run Now**, a **Schedule**, or a **Webhook**) and configure its settings.
3. The trigger appears in the list. To remove a trigger, select the delete icon on its row. Select **Next** to continue, or **Previous** to go back.

<figure><img src="https://3641047820-files.gitbook.io/~/files/v0/b/gitbook-x-prod.appspot.com/o/spaces%2Fzi8TZ3KjOFqUxK0zOIrL%2Fuploads%2Fgit-blob-ed7f79cb5c019dc087b84cfec71cbb645424c43d%2Fagent-wizard-triggers.png?alt=media" alt="The Add triggers dialog over Step 2 Triggers, listing Run now under General and the Daily, Weekly, Bi-weekly, Monthly and Quarterly schedules under Scheduler, each with a checkbox, and the Add and Discard buttons"><figcaption><p>The Add triggers dialog</p></figcaption></figure>

> See [Triggers](/manual/agents/triggers.md) for the full list of trigger types and a detailed guide to configuring Webhook triggers.

### Step 3: Tools

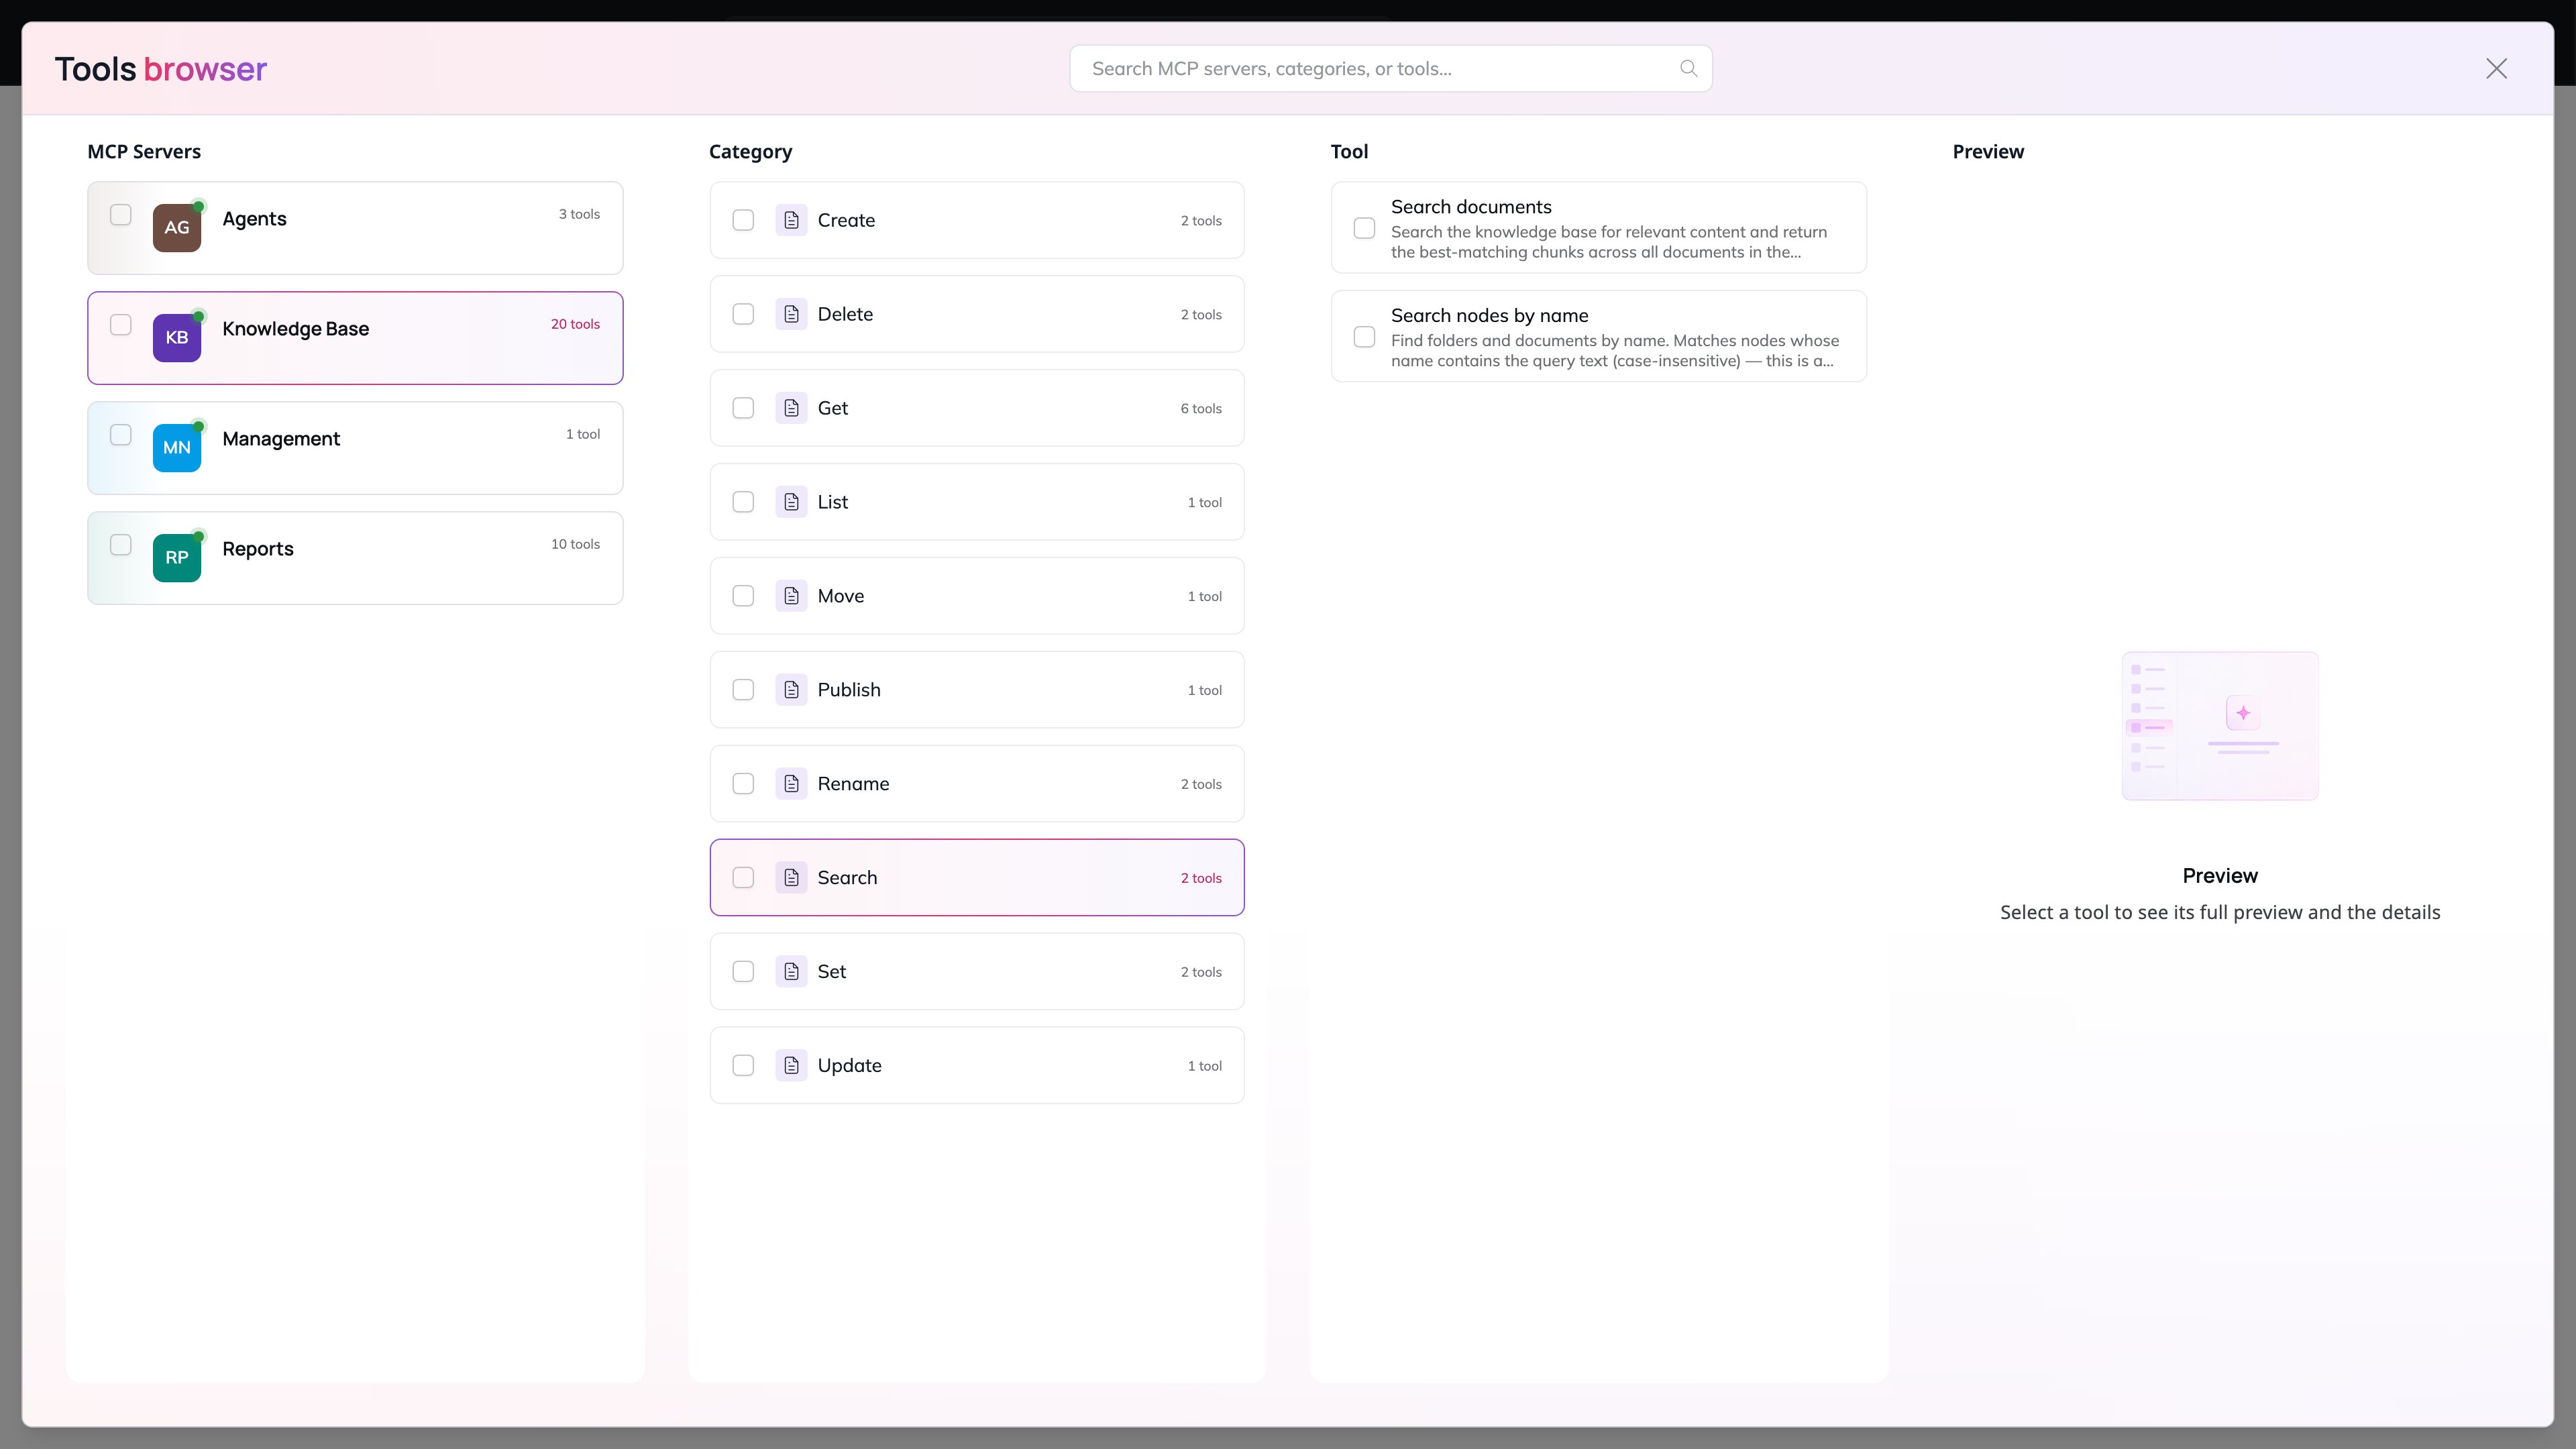
Connect external tools to your agent via **MCP Servers**. Tools give the agent the ability to perform actions beyond answering questions - for example, searching the web, calling an API, or querying a database. To add tools:

1. Select **Select tools** to open the tool selector.
2. Choose an MCP Server from the list and select the specific tools within it that the agent should be able to use.
3. Selected tools appear in the table below. To remove a tool, select the delete icon on its row, or select **Select tools** again to reopen the selector and change your selection. If the platform suggested tools based on your instructions, they will already appear here. Review and adjust as needed. Select **Next** to continue, or **Previous** to go back.

<figure><img src="https://3641047820-files.gitbook.io/~/files/v0/b/gitbook-x-prod.appspot.com/o/spaces%2Fzi8TZ3KjOFqUxK0zOIrL%2Fuploads%2Fgit-blob-9aa8f74b9d012398b2057ea77c0020fcd714aaf8%2Fagent-wizard-tools.png?alt=media" alt="The Tools browser with the Knowledge Base server and its Search category selected, the Tool column listing Search documents and Search nodes by name with checkboxes, and a Preview column"><figcaption><p>The Tools Browser</p></figcaption></figure>

### Step 4: Knowledge Base

Controls which Knowledge Base content the agent can retrieve when answering questions or generating content. Select one of the following options:

* **None** - no access to the Knowledge Base.
* **All** - access to the entire Knowledge Base.
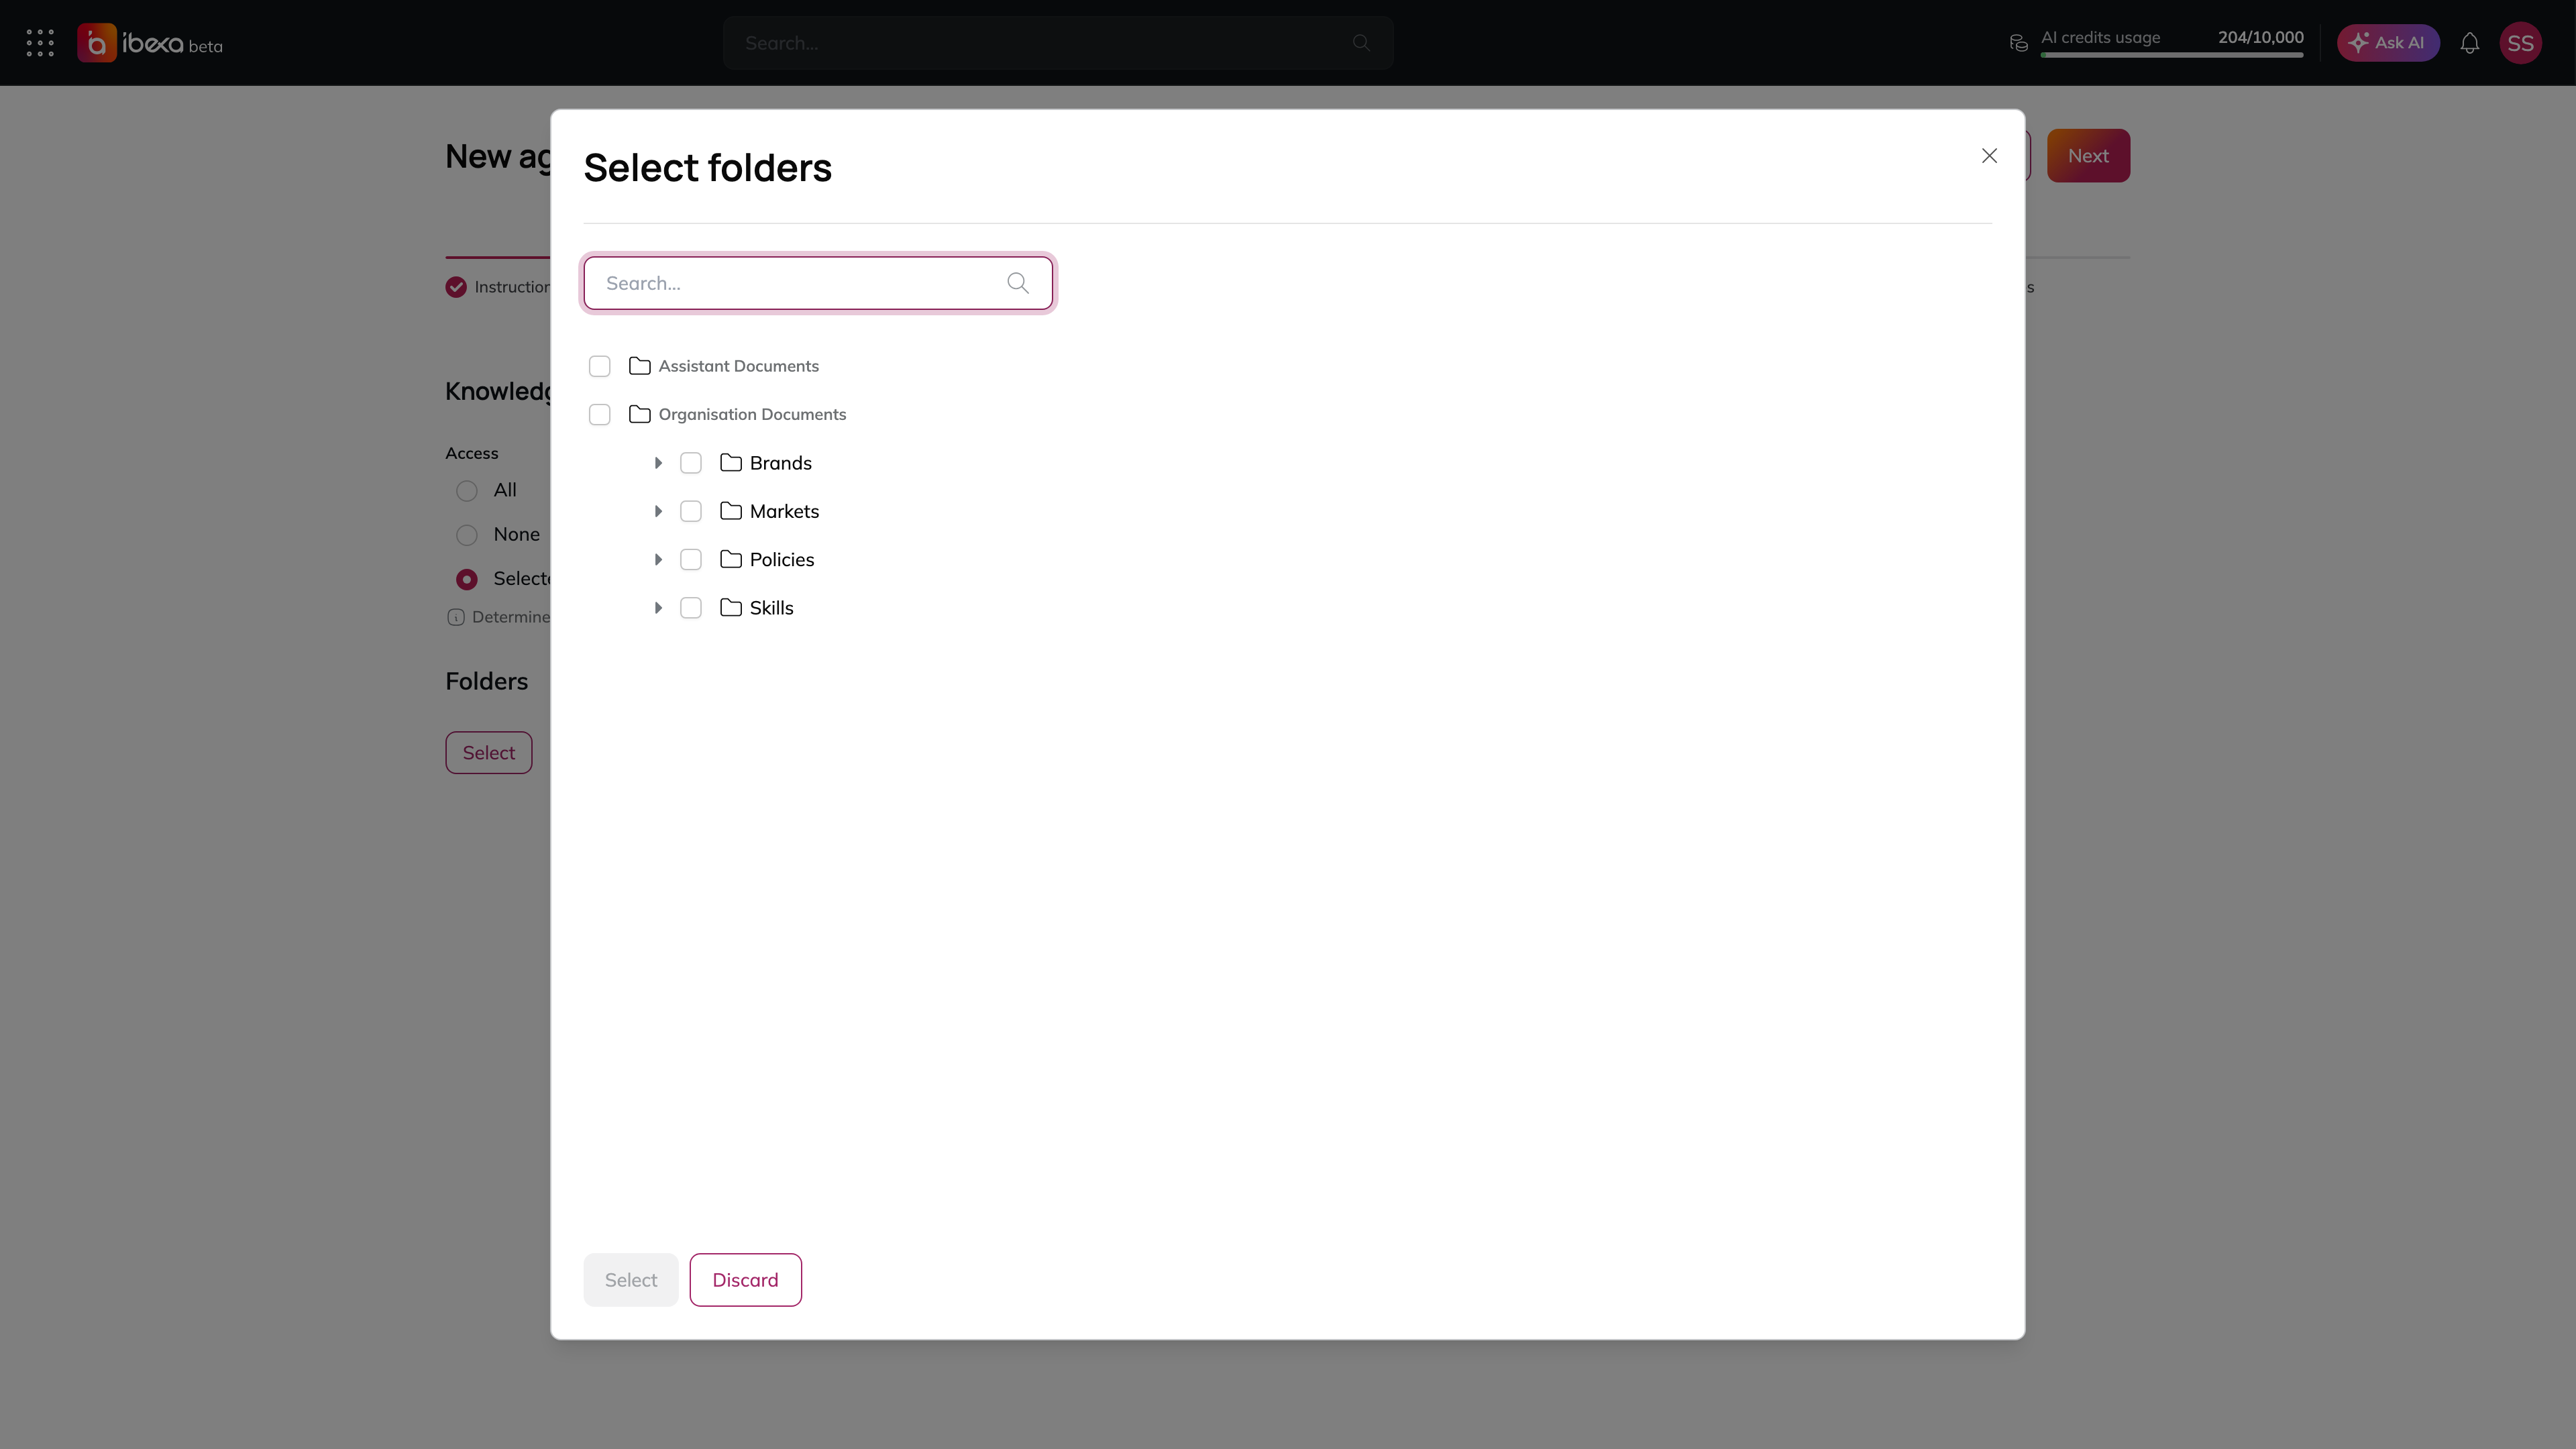
* **Selected folders** - access limited to specific folders or documents you select. Choosing **Selected folders** opens a folder/document picker dialog; selected items appear in a paginated, searchable list below the option, and can be removed individually or in bulk.

<figure><img src="https://3641047820-files.gitbook.io/~/files/v0/b/gitbook-x-prod.appspot.com/o/spaces%2Fzi8TZ3KjOFqUxK0zOIrL%2Fuploads%2Fgit-blob-0d8ba759e7c297def673918dfa7d1bfe96144178%2Fagent-wizard-knowledge-base.png?alt=media" alt="The Select folders picker open over Step 4 Knowledge base, where Selected folders is chosen as Access, showing the Assistant Documents and Organisation Documents headings with the Brands, Markets, Policies and Skills folders and their checkboxes"><figcaption><p>Choosing folders for Selected folders access</p></figcaption></figure>

Select **Next** to continue, or **Previous** to go back.

### Step 5: Quality Metrics

Optionally define which quality metrics are automatically evaluated on this agent's runs, right from creation. This is a separate, more advanced configuration than the [Impact Metric](#step-6-general-properties) set in the next step - Impact Metric measures business value, while Quality Metrics measure how well the agent is actually performing.

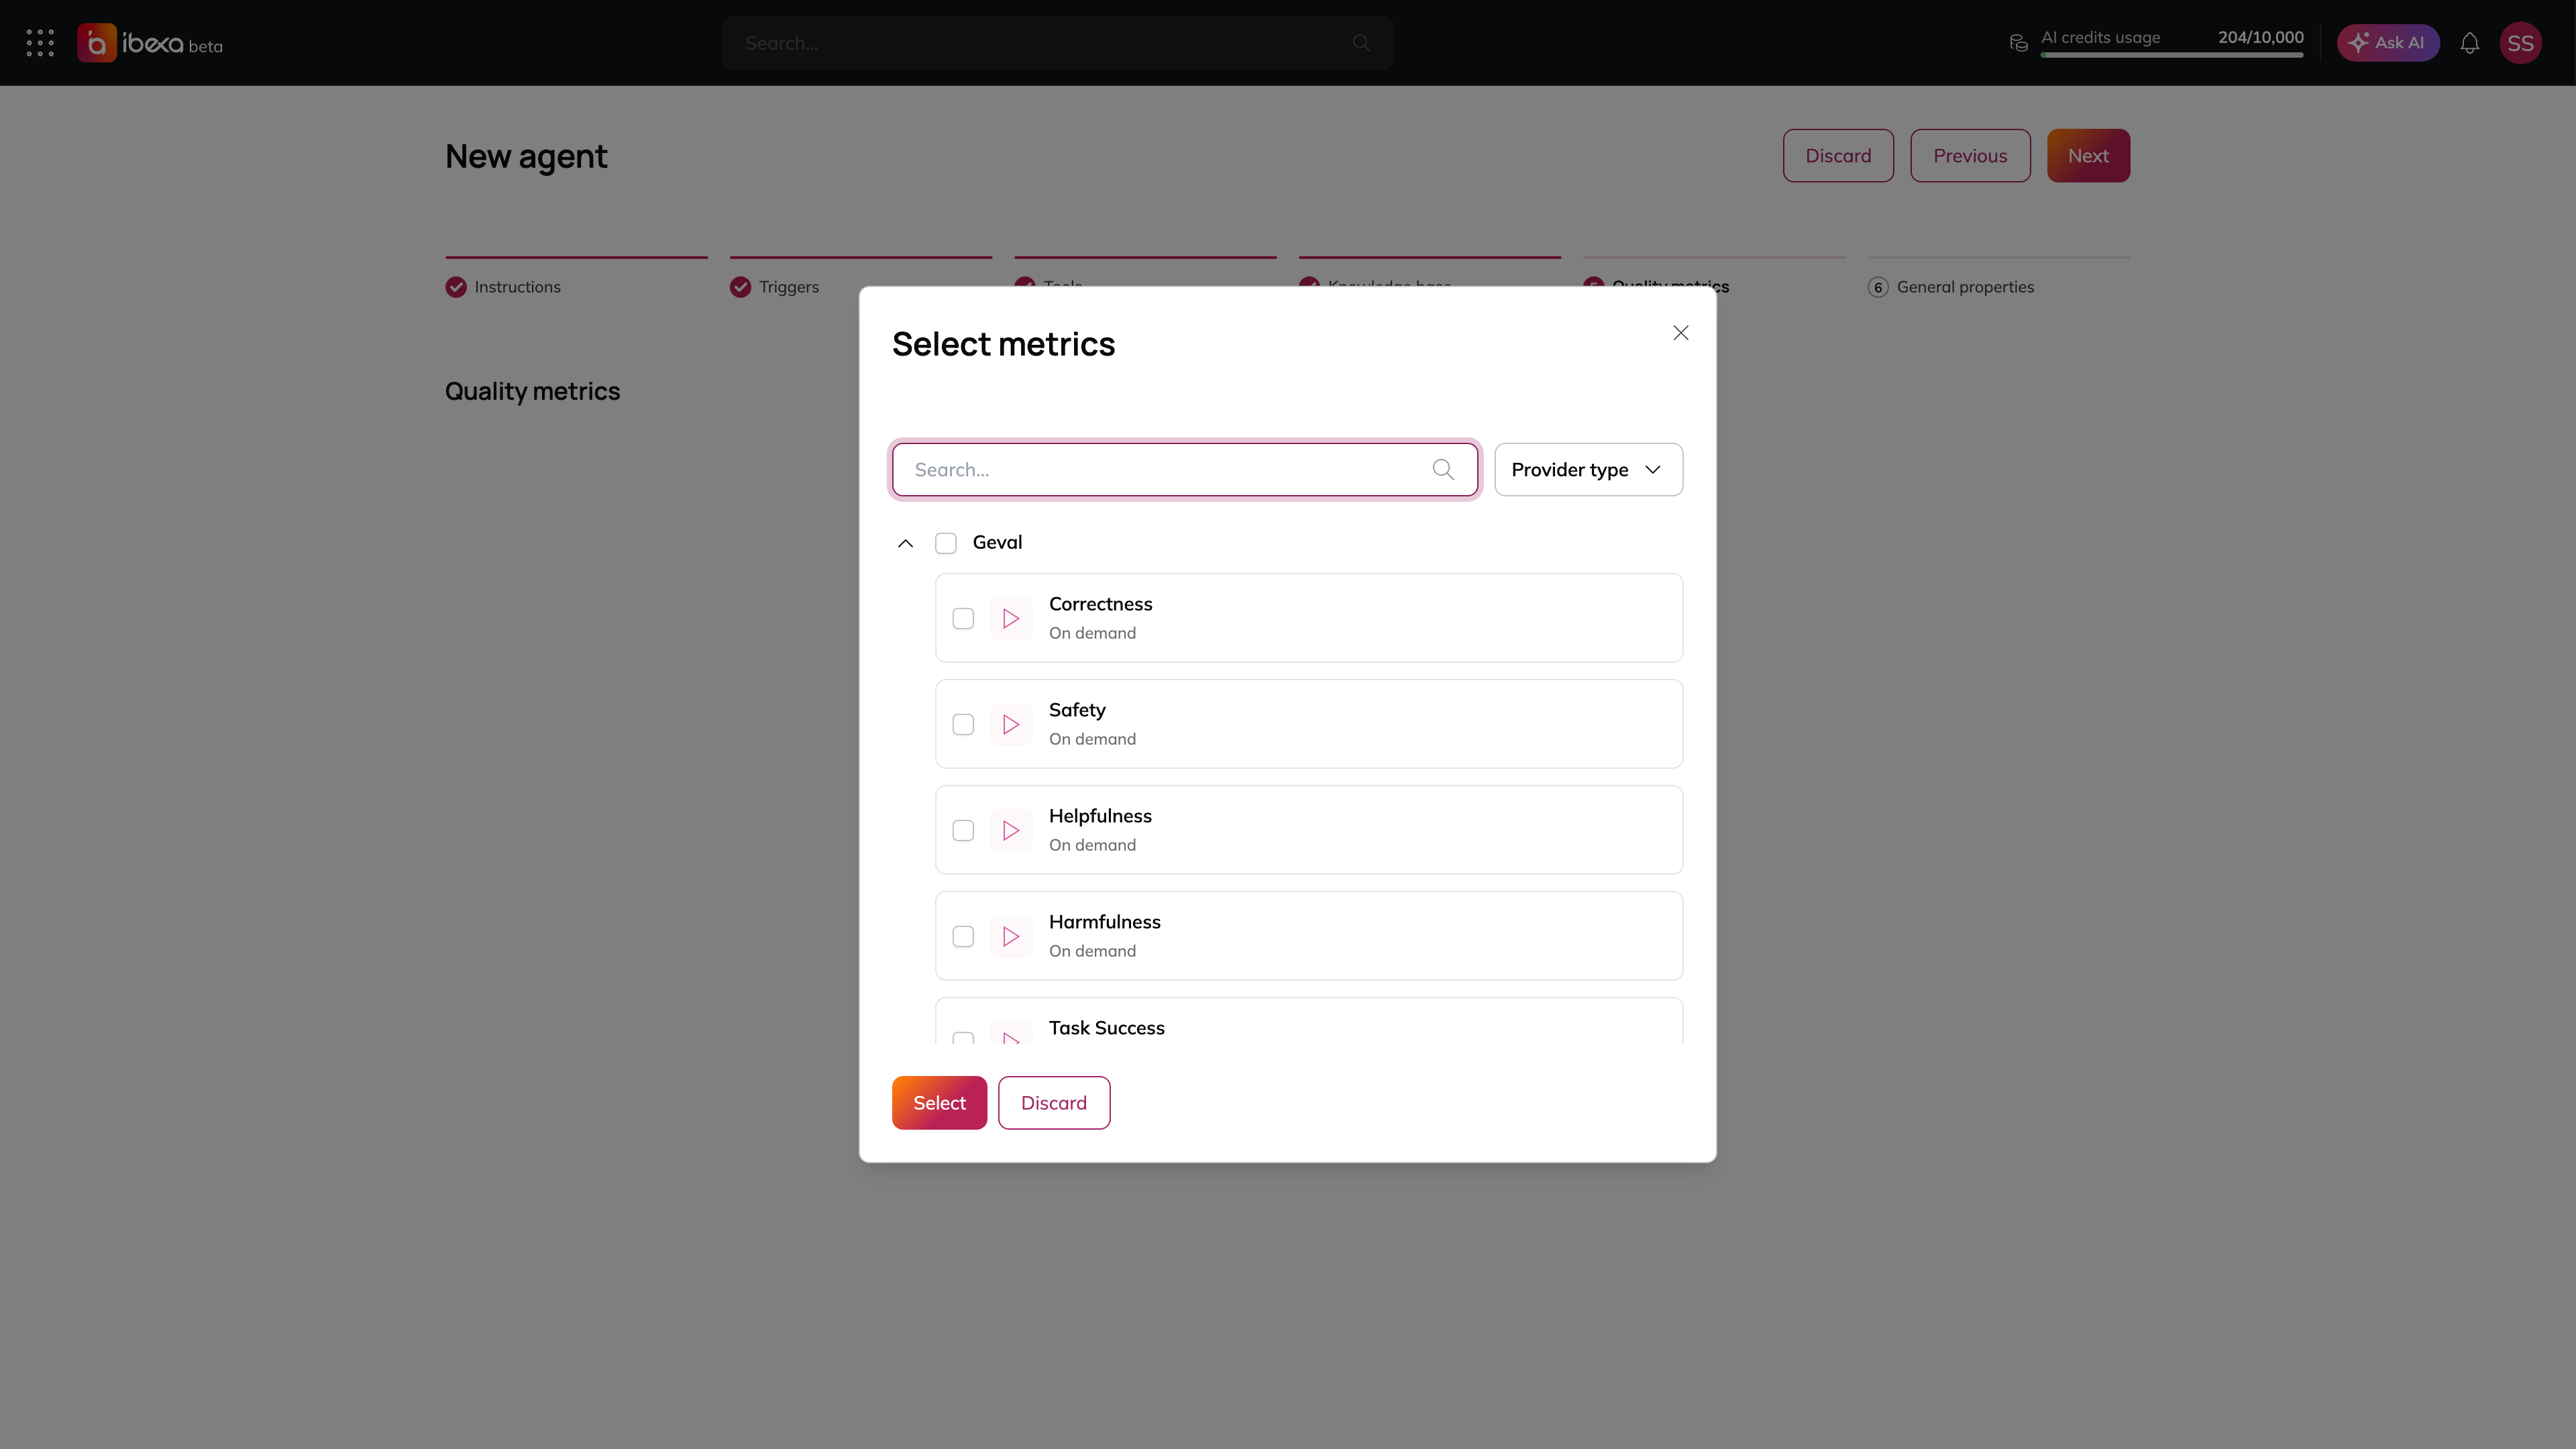
1. Select **Add metric** to open the metric catalog, grouped by evaluation method (e.g. **Rule Based**, **GEval**).
2. Select one or more metrics to add. Available metrics include:

   * **Rule-based** (computed directly from execution data): **Success Rate**, **Latency**, **Cost**, **Latency to First Token**.
   * **GEval** (LLM-as-judge, scored against a rubric): **Correctness**, **Safety**, **Helpfulness**, **Harmfulness**, **Task Success**, **Tool Correctness**, **Groundedness**, **Citation Accuracy**, **Completeness**, **Coherence**, **Relevance**, **Hallucination**, **Toxicity**, **PII Leakage**, **Prompt Rage**.

   See the [Quality Metrics](/manual/agents/quality-metrics-reference.md) reference for what each metric measures, its unit, and its direction (higher vs. lower is better).
3. Each added metric appears as a draggable card (reorder by dragging) where you configure:
   * **Threshold** - the value the metric must reach to count as "passed" (in the metric's own unit, e.g. 80 for an 80% success rate, or 5 for a 5-second latency cap).
   * **Weight** - how much this metric contributes to the run's overall quality score, shown as a badge on the card. Adjusting one metric's weight automatically rebalances the others so the total always stays at 100%.
   * **Quality gate** - when enabled, a failure on this metric skips evaluating the remaining metrics for that run; gated metrics show a **Gate** badge on the card.
4. To remove a metric, select the delete icon on its card; once several metrics are added, checkboxes and a search box appear to select and remove multiple at once. Select **Next** to continue, or **Previous** to go back.

<figure><img src="https://3641047820-files.gitbook.io/~/files/v0/b/gitbook-x-prod.appspot.com/o/spaces%2Fzi8TZ3KjOFqUxK0zOIrL%2Fuploads%2Fgit-blob-25c339beb567e56975d545589018e7d9b0b6503d%2Fagent-wizard-quality-metrics.png?alt=media" alt="The Select metrics dialog over Step 5 Quality metrics, with a search box, the Provider type filter and the Geval group listing Correctness, Safety, Helpfulness, Harmfulness and Task Success, and the Select and Discard buttons"><figcaption><p>The Select metrics dialog</p></figcaption></figure>

> **Note:** The percentage of evaluated runs (**Sample size**) defaults to 100% at creation and can only be adjusted afterwards from the [Edit Agent page](#configuring-quality-monitoring). Leaving this step empty (no metrics added) disables quality monitoring for the agent - its **Quality** tab will show an empty state instead of results.

### Step 6: General Properties

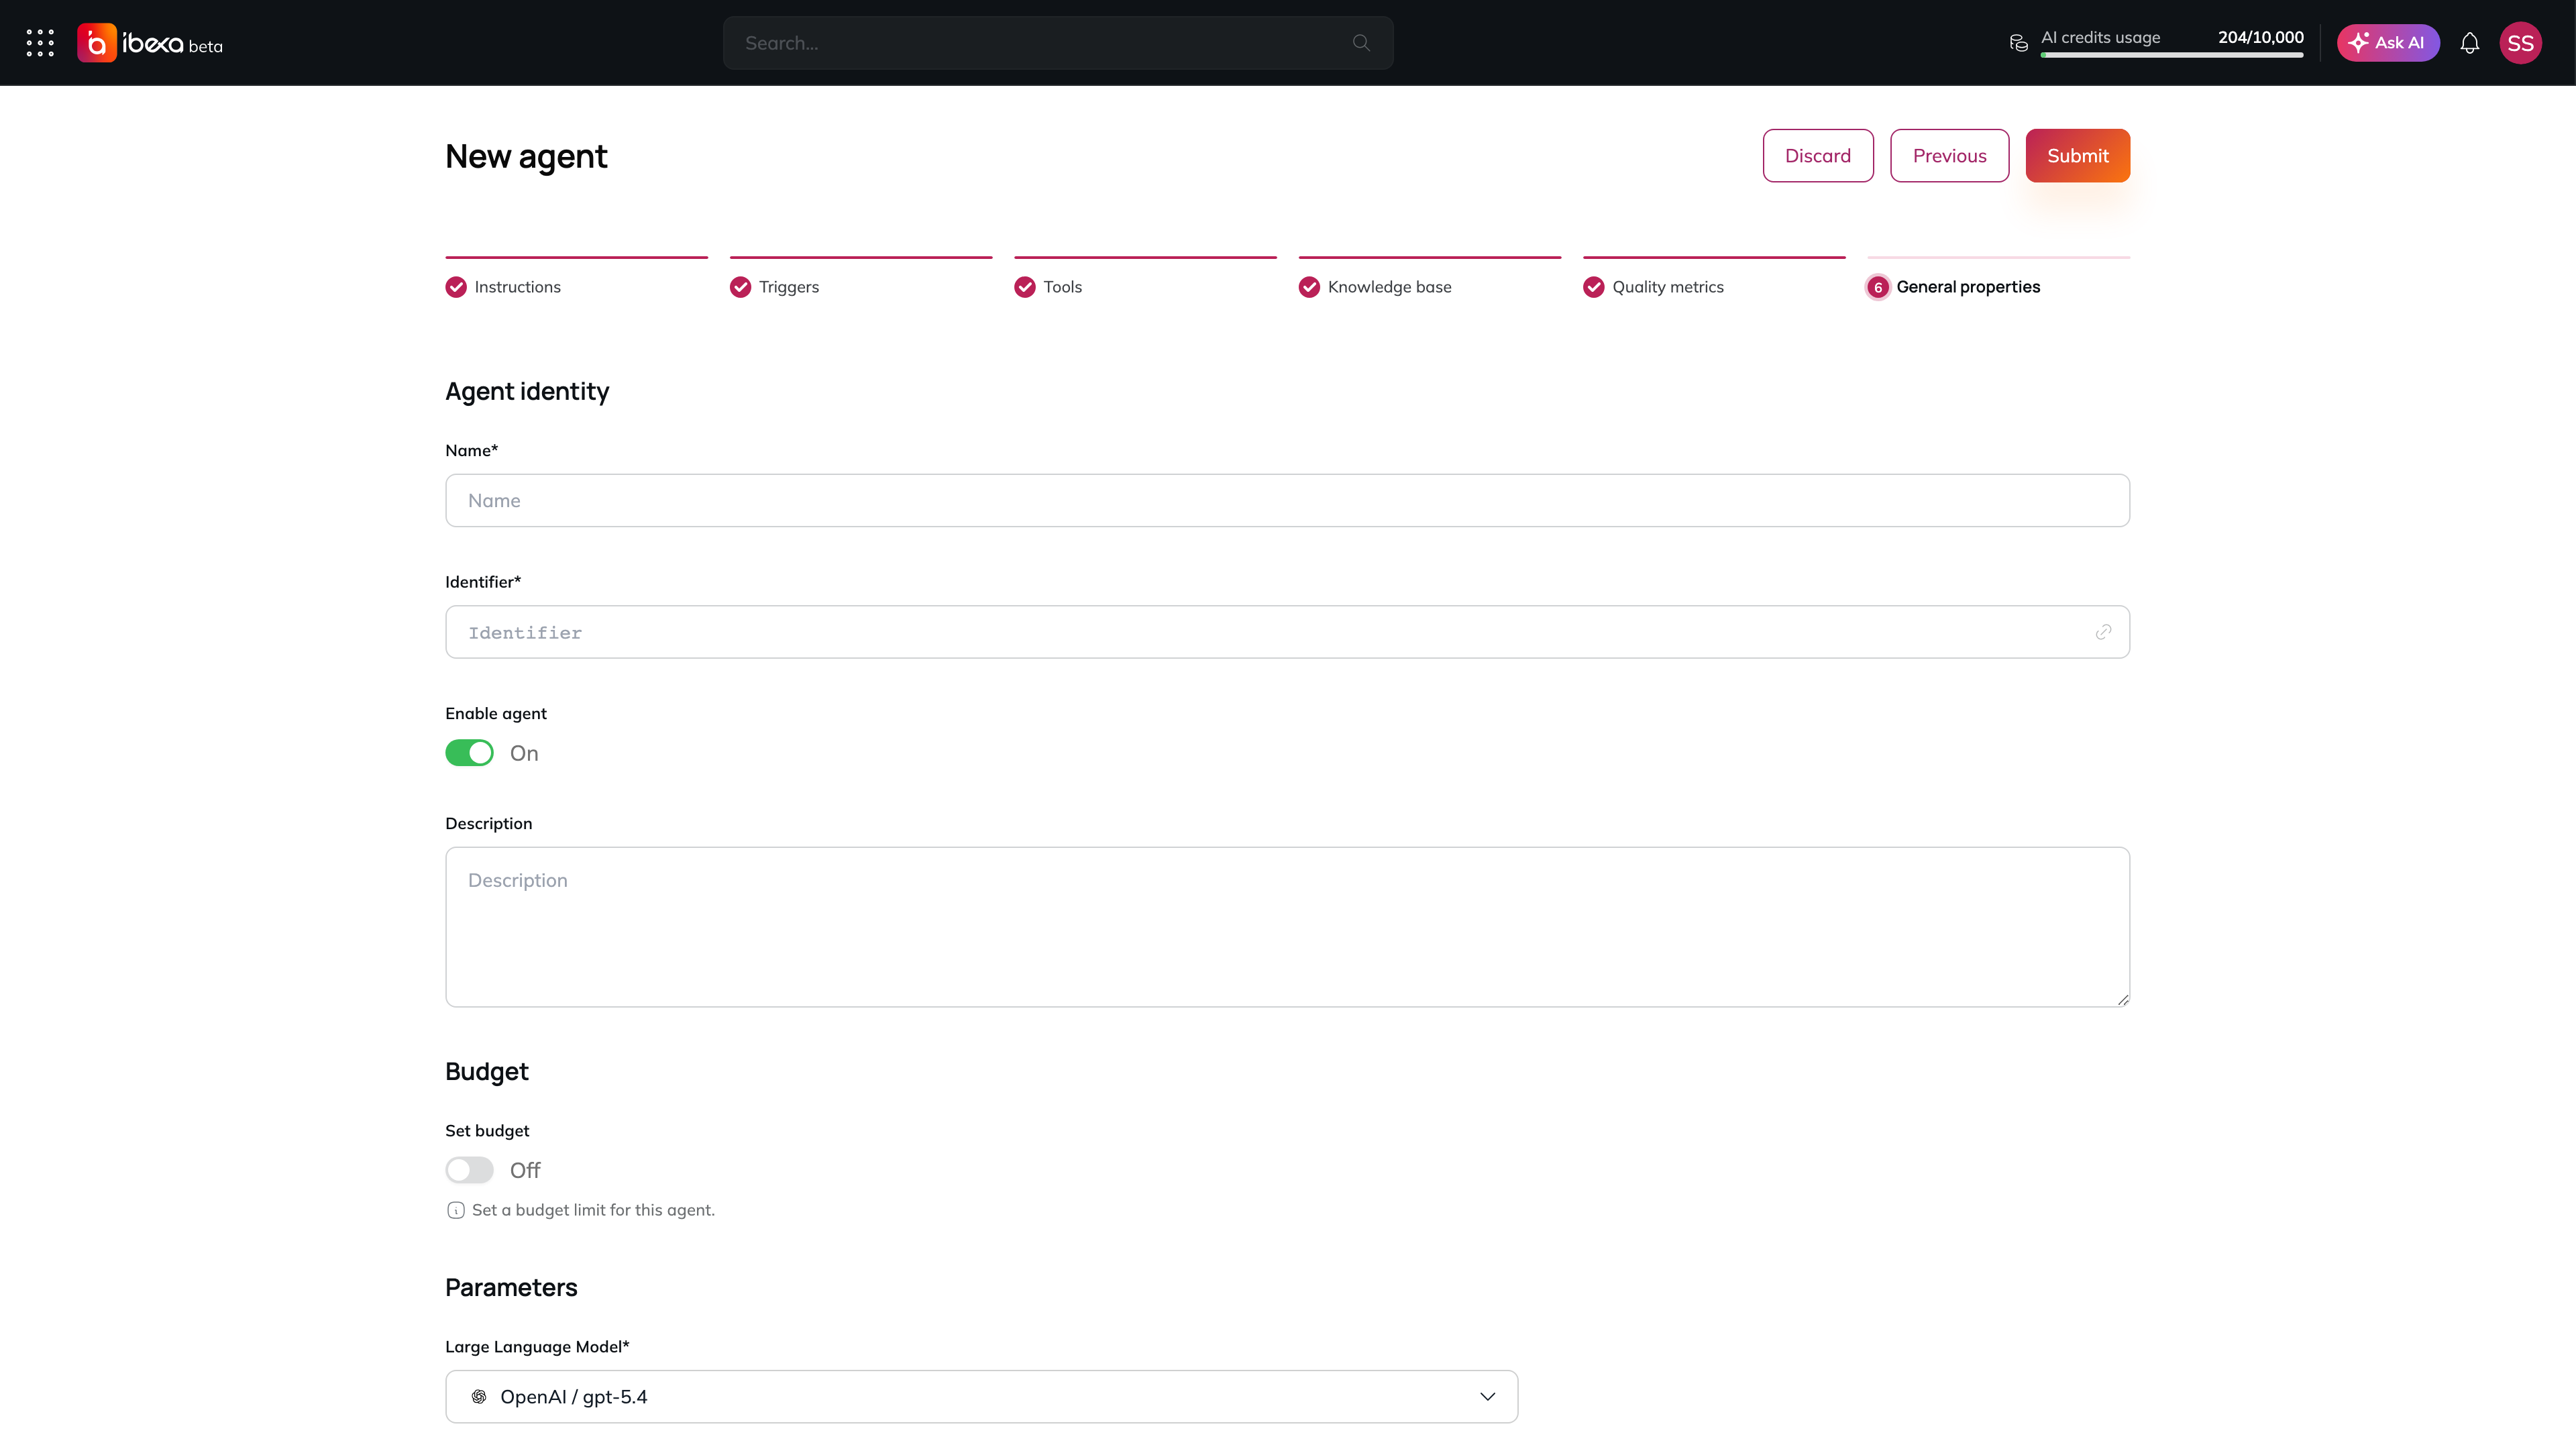
<figure><img src="https://3641047820-files.gitbook.io/~/files/v0/b/gitbook-x-prod.appspot.com/o/spaces%2Fzi8TZ3KjOFqUxK0zOIrL%2Fuploads%2Fgit-blob-b4e4f8206cb9dba33ef6838c4ed26e04b778ab8c%2Fagent-wizard-general-properties.png?alt=media" alt="Step 6 General properties with the Name, Identifier, Enable agent and Description fields, the Set budget toggle, the Large Language Model, Number of steps and Impact metric fields, the Use as subagent toggle, the Subagents Select button, and the Discard, Previous and Submit buttons"><figcaption><p>Step 6: General properties</p></figcaption></figure>

| Field                       | Required | Description                                                                                                                                                                                                                                                                                                                                                                                                          |
| --------------------------- | -------- | -------------------------------------------------------------------------------------------------------------------------------------------------------------------------------------------------------------------------------------------------------------------------------------------------------------------------------------------------------------------------------------------------------------------- |
| **Name**                    | Yes      | The display name for the agent (max 100 characters).                                                                                                                                                                                                                                                                                                                                                                 |
| **Identifier**              | Yes      | A unique system identifier, auto-generated from the name. You can edit it if needed (max 100 characters).                                                                                                                                                                                                                                                                                                            |
| **Enabled**                 | -        | Checked by default. Uncheck to create the agent in a disabled state.                                                                                                                                                                                                                                                                                                                                                 |
| **Description**             | No       | A short description of what the agent does. Shown to users when browsing agents.                                                                                                                                                                                                                                                                                                                                     |
| **Set Budget**              | No       | When enabled, an additional **Budget Amount** field appears where you can set a maximum credit spend for this agent (in credits).                                                                                                                                                                                                                                                                                    |
| **Model**                   | Yes      | The AI language model the agent will use to process requests. Pre-filled with your organisation's default model if one is set.                                                                                                                                                                                                                                                                                       |
| **Maximum number of steps** | Yes      | Caps how many steps the agent can take in its tool-calling loop before stopping. Use the slider to set a value between 10 and 100 (default: 25).                                                                                                                                                                                                                                                                     |
| **Impact Metric**           | No       | Declares the value one successful run of this agent generates, so the platform can report the agent's cumulative impact over time. Made up of three parts: a **metric type** (e.g. "Saved time", "Saved money", "Resolved issues", "New leads"), a **value per run** (e.g. `30`), and a **unit** the value is denominated in (e.g. "min", "EUR", "leads"). Leave unset if this agent's impact should not be tracked. |
| **Can be sub-agent**        | No       | When checked, this agent can be used as a component inside other agents - and, since a sub-agent cannot itself have sub-agents, its own **Select sub-agents** button becomes disabled. See [Agent Delegation](/manual/agents/agent-delegation.md) for the full multi-agent workflow.                                                                                                                                 |
| **Sub-agents**              | No       | When **Can be sub-agent** is off, select **Select sub-agents** to open a picker and add other agents this agent can delegate to. Added sub-agents appear in a list where they can be removed individually.                                                                                                                                                                                                           |

**Select Submit to create the agent. A confirmation message will appear and you will be taken to the new agent's detail page.**

## Viewing an Agent

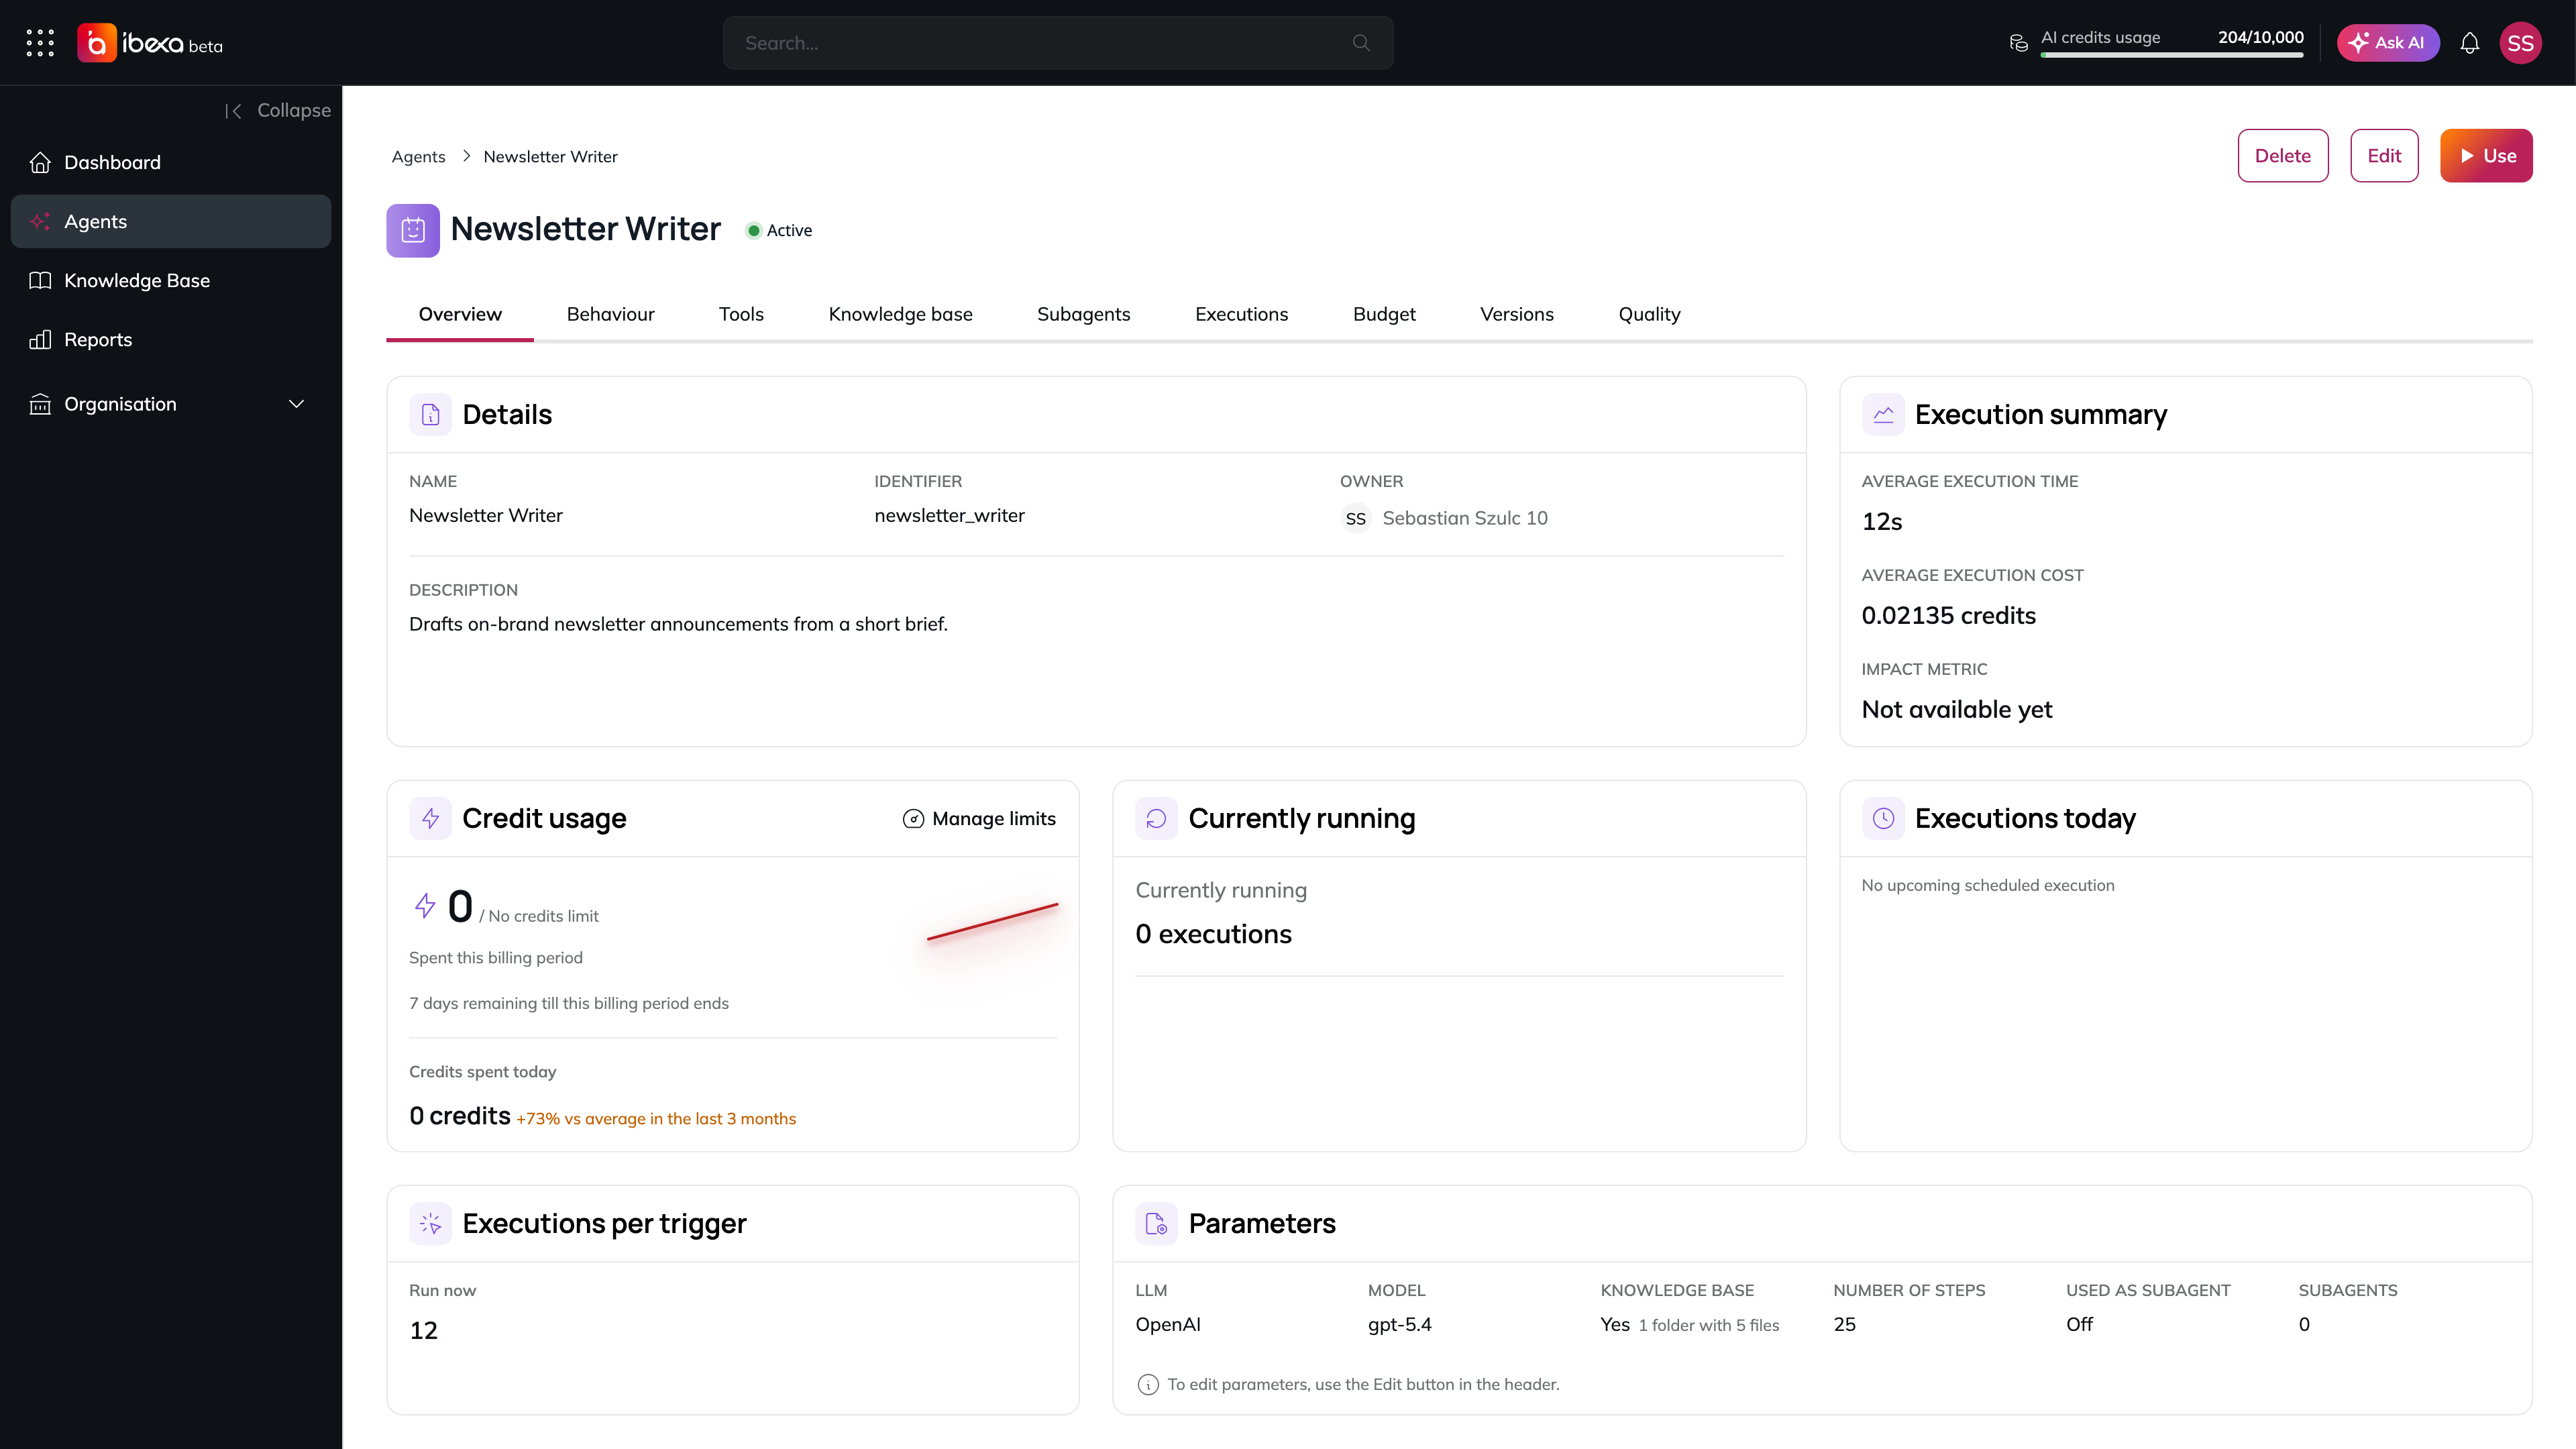
Select any agent from the Agents page to open its detail page. The page displays the agent's name and status badge at the top, along with action buttons and the following tabs:

| Tab            | Contents                                                                                                                                                                                                                                                                                                                                                              |
| -------------- | --------------------------------------------------------------------------------------------------------------------------------------------------------------------------------------------------------------------------------------------------------------------------------------------------------------------------------------------------------------------- |
| **Details**    | An overview dashboard: agent properties (name, identifier, owner, description), execution summary and Impact Metric progress, credit usage (with **Manage limits** and, when over budget, **Notify owner** actions), currently running executions, executions run today, executions per trigger, and configured parameters (model, max steps, Knowledge Base access). |
| **Behaviour**  | The agent's instructions and configured triggers.                                                                                                                                                                                                                                                                                                                     |
| **Tools**      | The MCP server tools connected to this agent.                                                                                                                                                                                                                                                                                                                         |
| **Subagents**  | Other agents this agent uses as sub-agents. See [Agent Delegation](/manual/agents/agent-delegation.md).                                                                                                                                                                                                                                                               |
| **Quality**    | Quality monitoring results - overall quality score trend, pass/fail counts, and per-metric breakdowns *(only shown once Quality Monitoring is configured - see* [*below*](#configuring-quality-monitoring)*)*.                                                                                                                                                        |
| **Budget**     | Impact Metric summary (if configured), credit usage history chart, and cost forecast for this agent.                                                                                                                                                                                                                                                                  |
| **Executions** | A log of all past runs, including status and success rate chart.                                                                                                                                                                                                                                                                                                      |
| **Versions**   | Agent version history *(coming soon)*.                                                                                                                                                                                                                                                                                                                                |

<figure><img src="https://3641047820-files.gitbook.io/~/files/v0/b/gitbook-x-prod.appspot.com/o/spaces%2Fzi8TZ3KjOFqUxK0zOIrL%2Fuploads%2Fgit-blob-a8a2f7ff4027d9b719c1b2913551219875c60ae3%2Fagent-overview.png?alt=media" alt="The Newsletter Writer detail page on the Overview tab, with the Delete, Edit and Use buttons, the row of tabs, and the Details, Execution summary, Credit usage, Currently running and Executions today panels"><figcaption><p>An agent detail page on the Overview tab</p></figcaption></figure>

## Testing an Agent

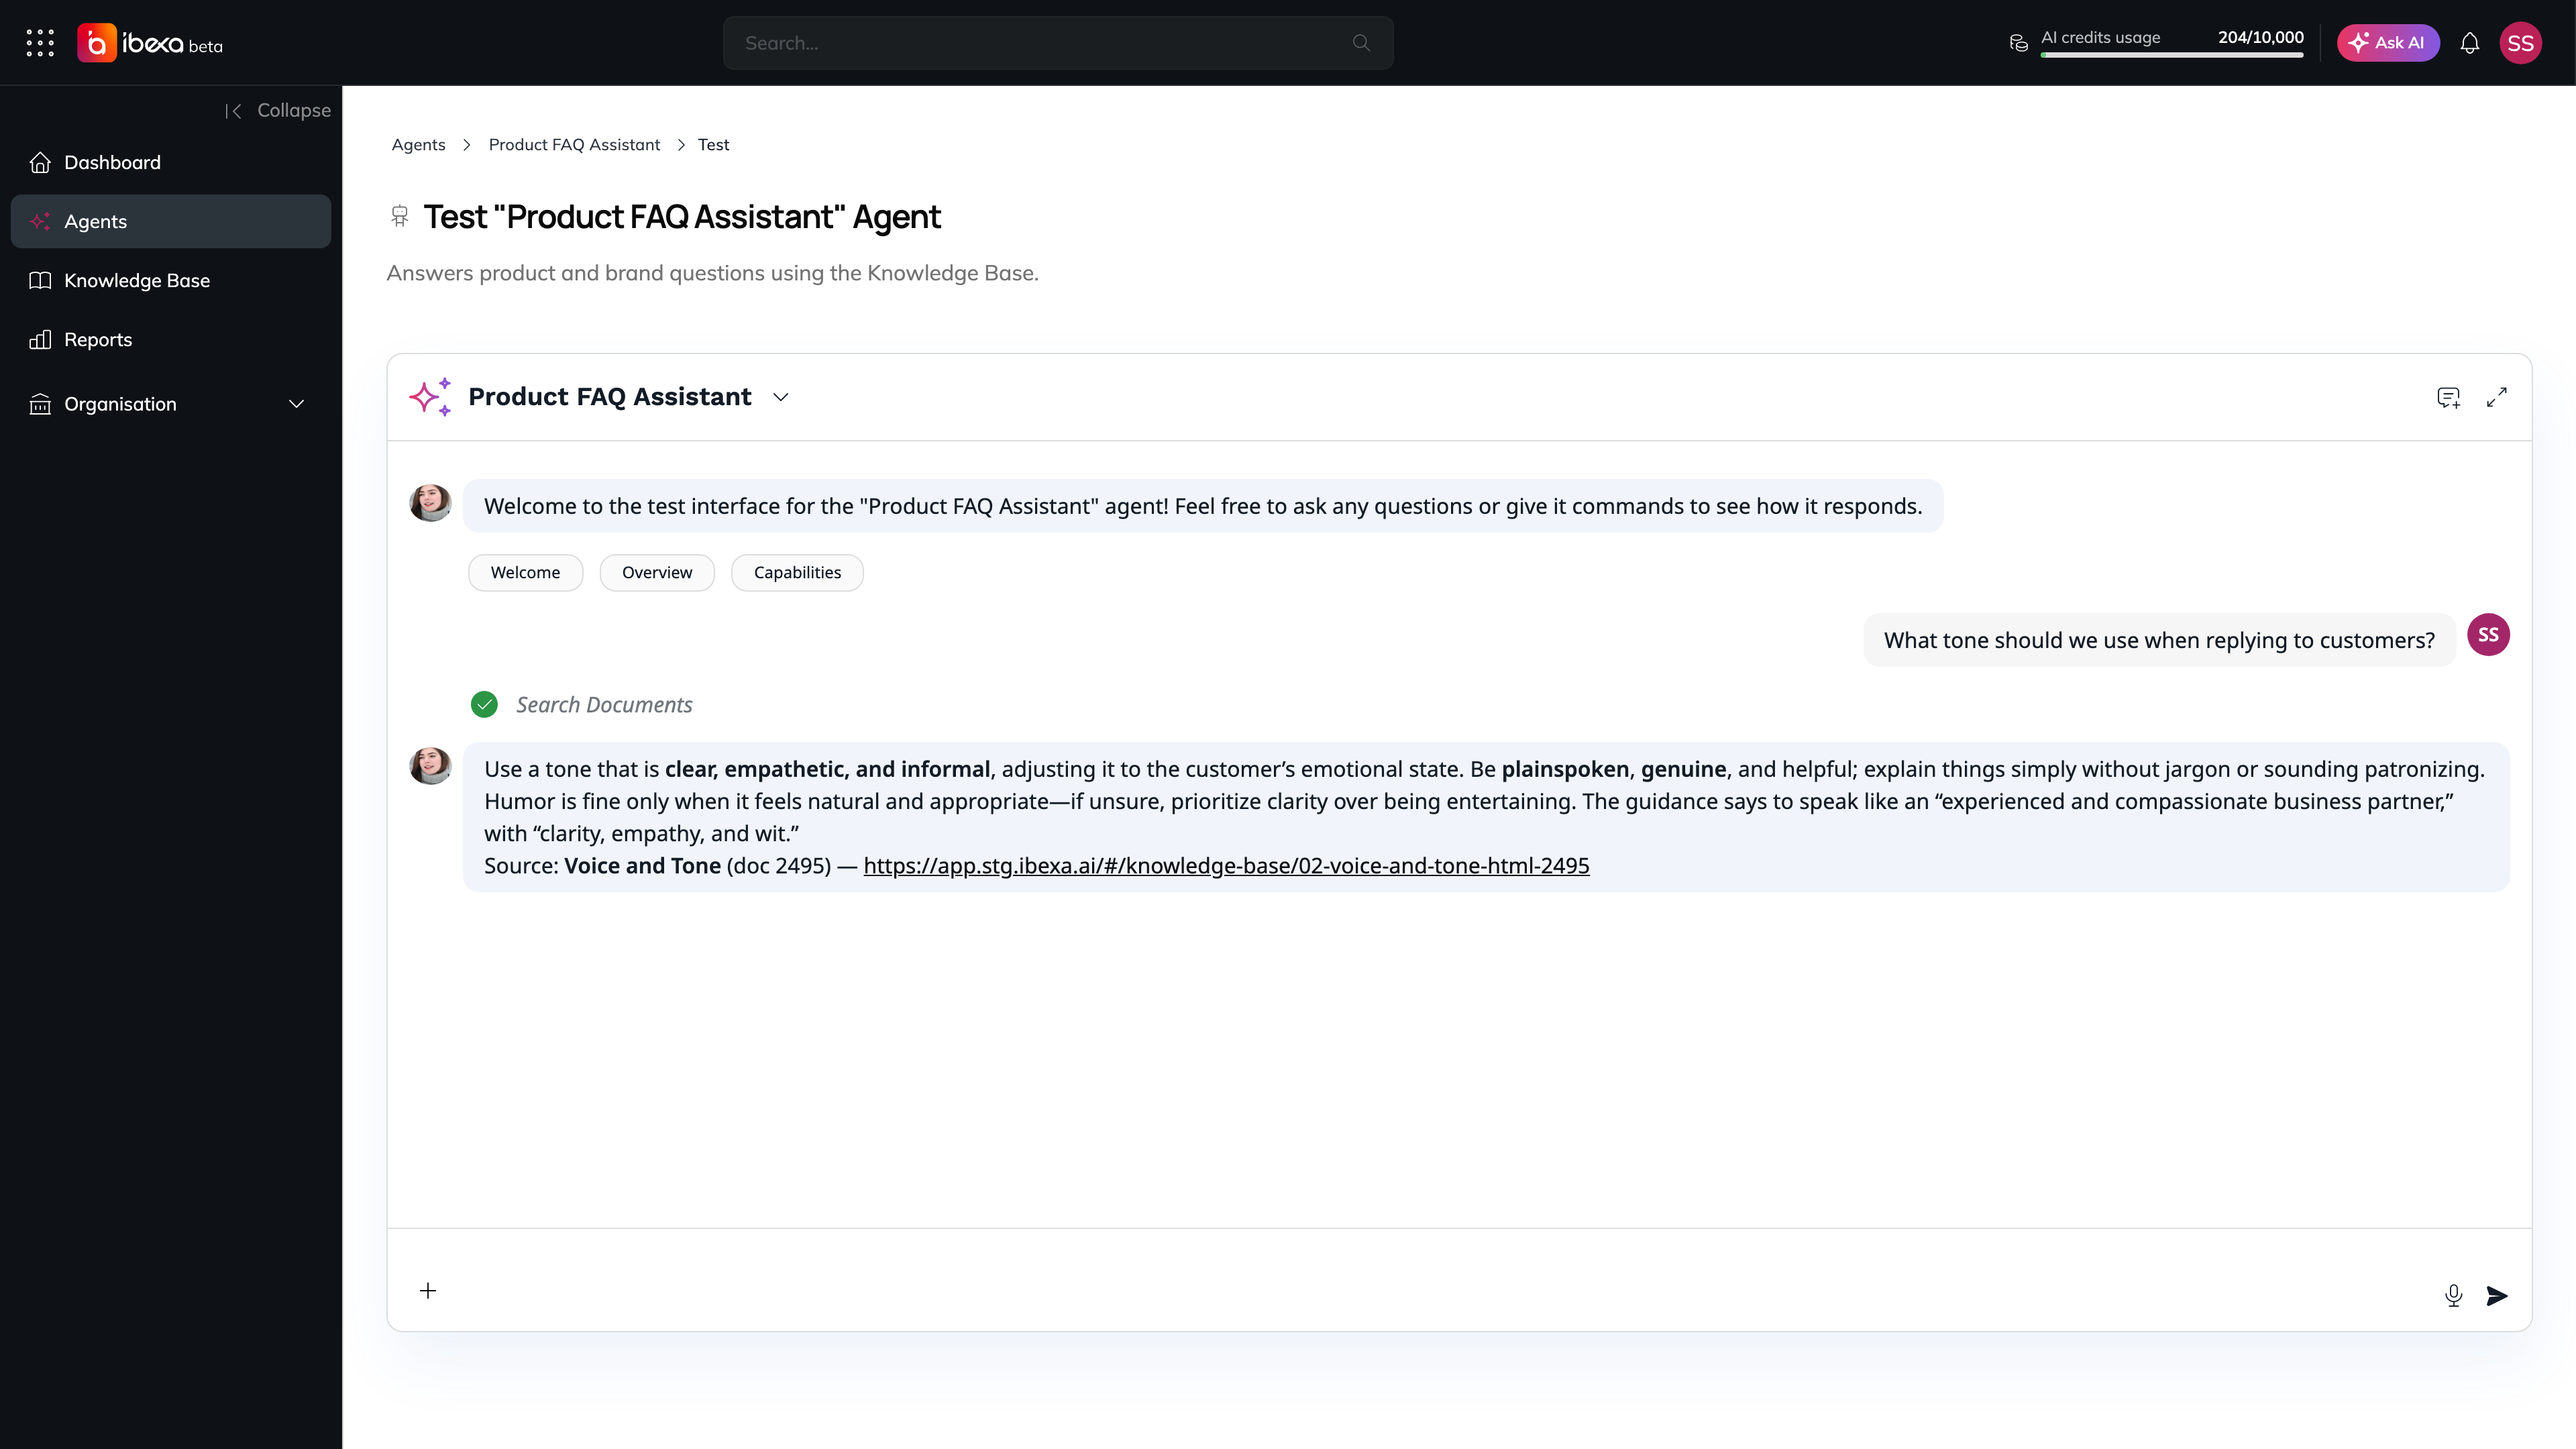
You can have a live conversation with an agent to verify it behaves as expected before sharing it with your organisation.

1. Open the agent's detail page.
2. Select **Run test** from the actions area.
3. The Test page opens with an embedded chat interface.
4. Type a message or select one of the suggested prompts (e.g. *"Hi!"*, *"What can you do for me?"*, *"What are your capabilities?"*) to start the conversation.

<figure><img src="https://3641047820-files.gitbook.io/~/files/v0/b/gitbook-x-prod.appspot.com/o/spaces%2Fzi8TZ3KjOFqUxK0zOIrL%2Fuploads%2Fgit-blob-5d4c07b9831258033752b98a90fb786eafcae7b7%2Fagent-test-page.png?alt=media" alt="The Test page of the Product FAQ Assistant agent with a question about the tone to use with customers, a completed Search Documents tool call, and the agent answer citing the Voice and Tone document"><figcaption><p>Testing an agent on its Test page</p></figcaption></figure>

## Editing an Agent

1. Open the agent's detail page.
2. Select **Edit** from the actions area.
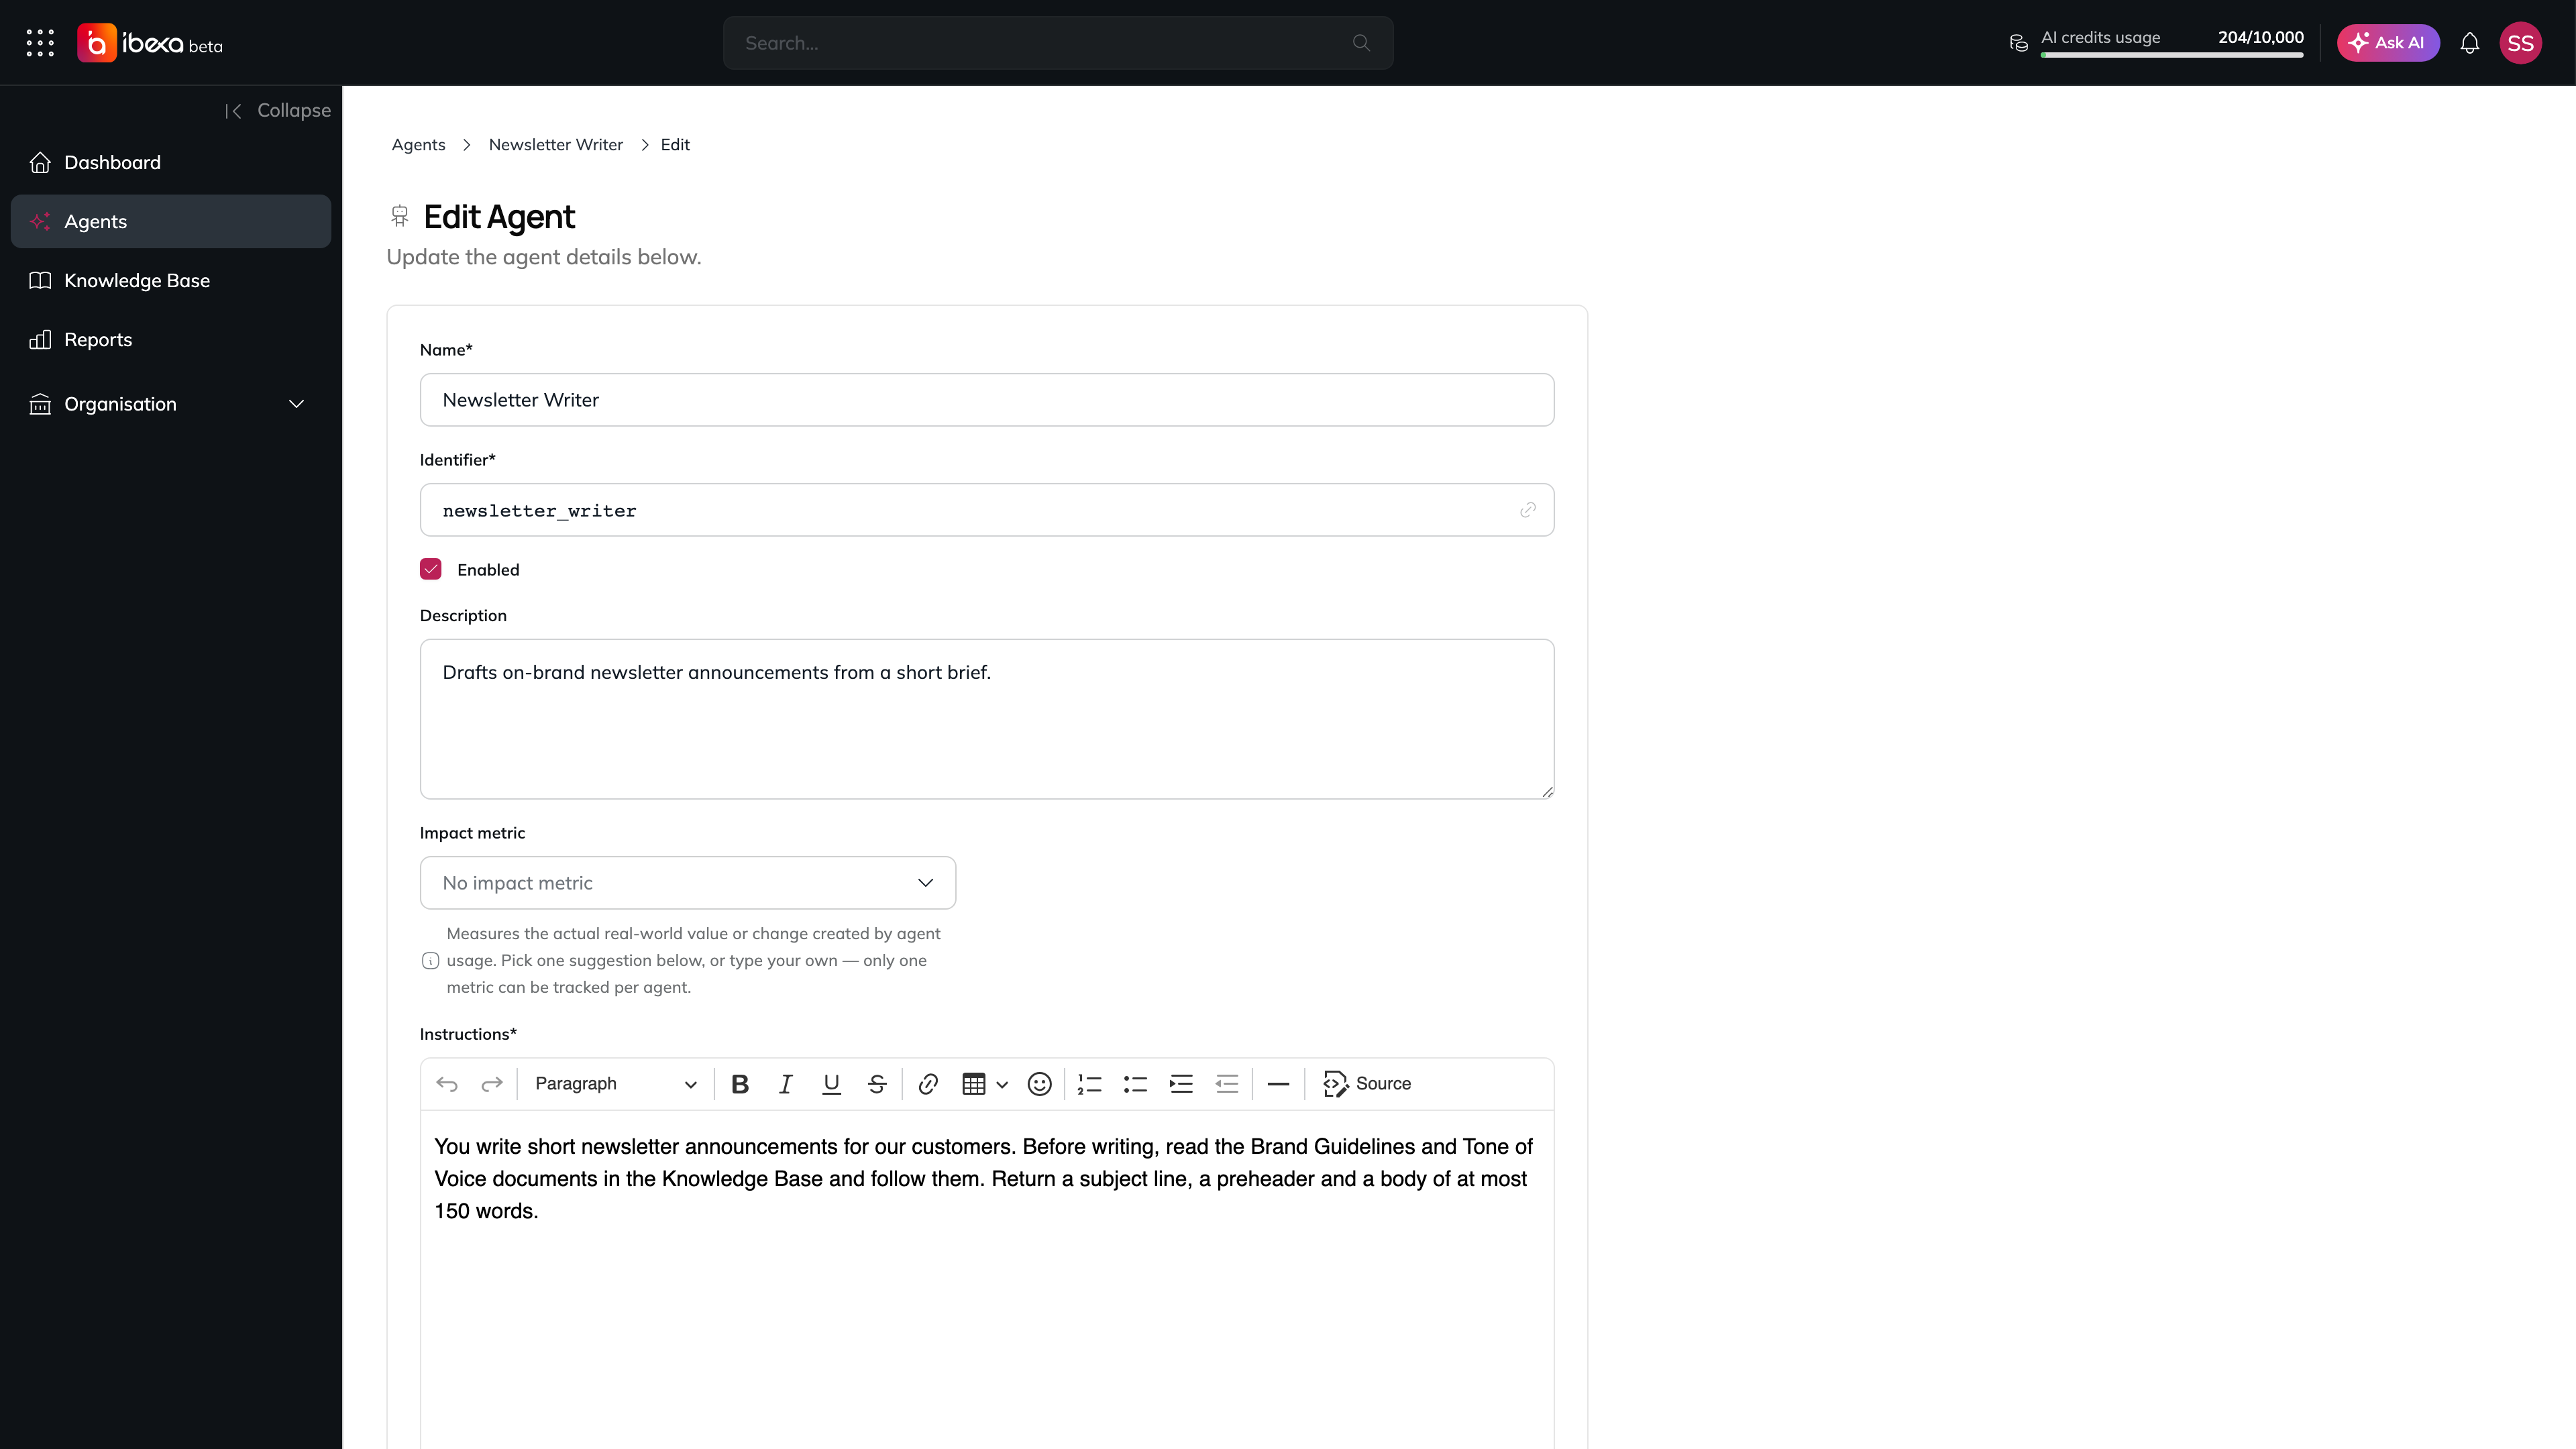
3. The Edit Agent page opens, pre-filled with the current configuration.
4. Make your changes and select **Submit** to save, or **Cancel** to discard.

<figure><img src="https://3641047820-files.gitbook.io/~/files/v0/b/gitbook-x-prod.appspot.com/o/spaces%2Fzi8TZ3KjOFqUxK0zOIrL%2Fuploads%2Fgit-blob-a26adfd4b7d7781abf41e3b1f52bebe97ce21add%2Fagent-edit.png?alt=media" alt="The top of the Edit Agent page for Newsletter Writer with the Name, Identifier, Enabled, Description and Impact metric fields and the start of the Instructions editor"><figcaption><p>The Edit Agent page</p></figcaption></figure>

### Configuring Quality Monitoring

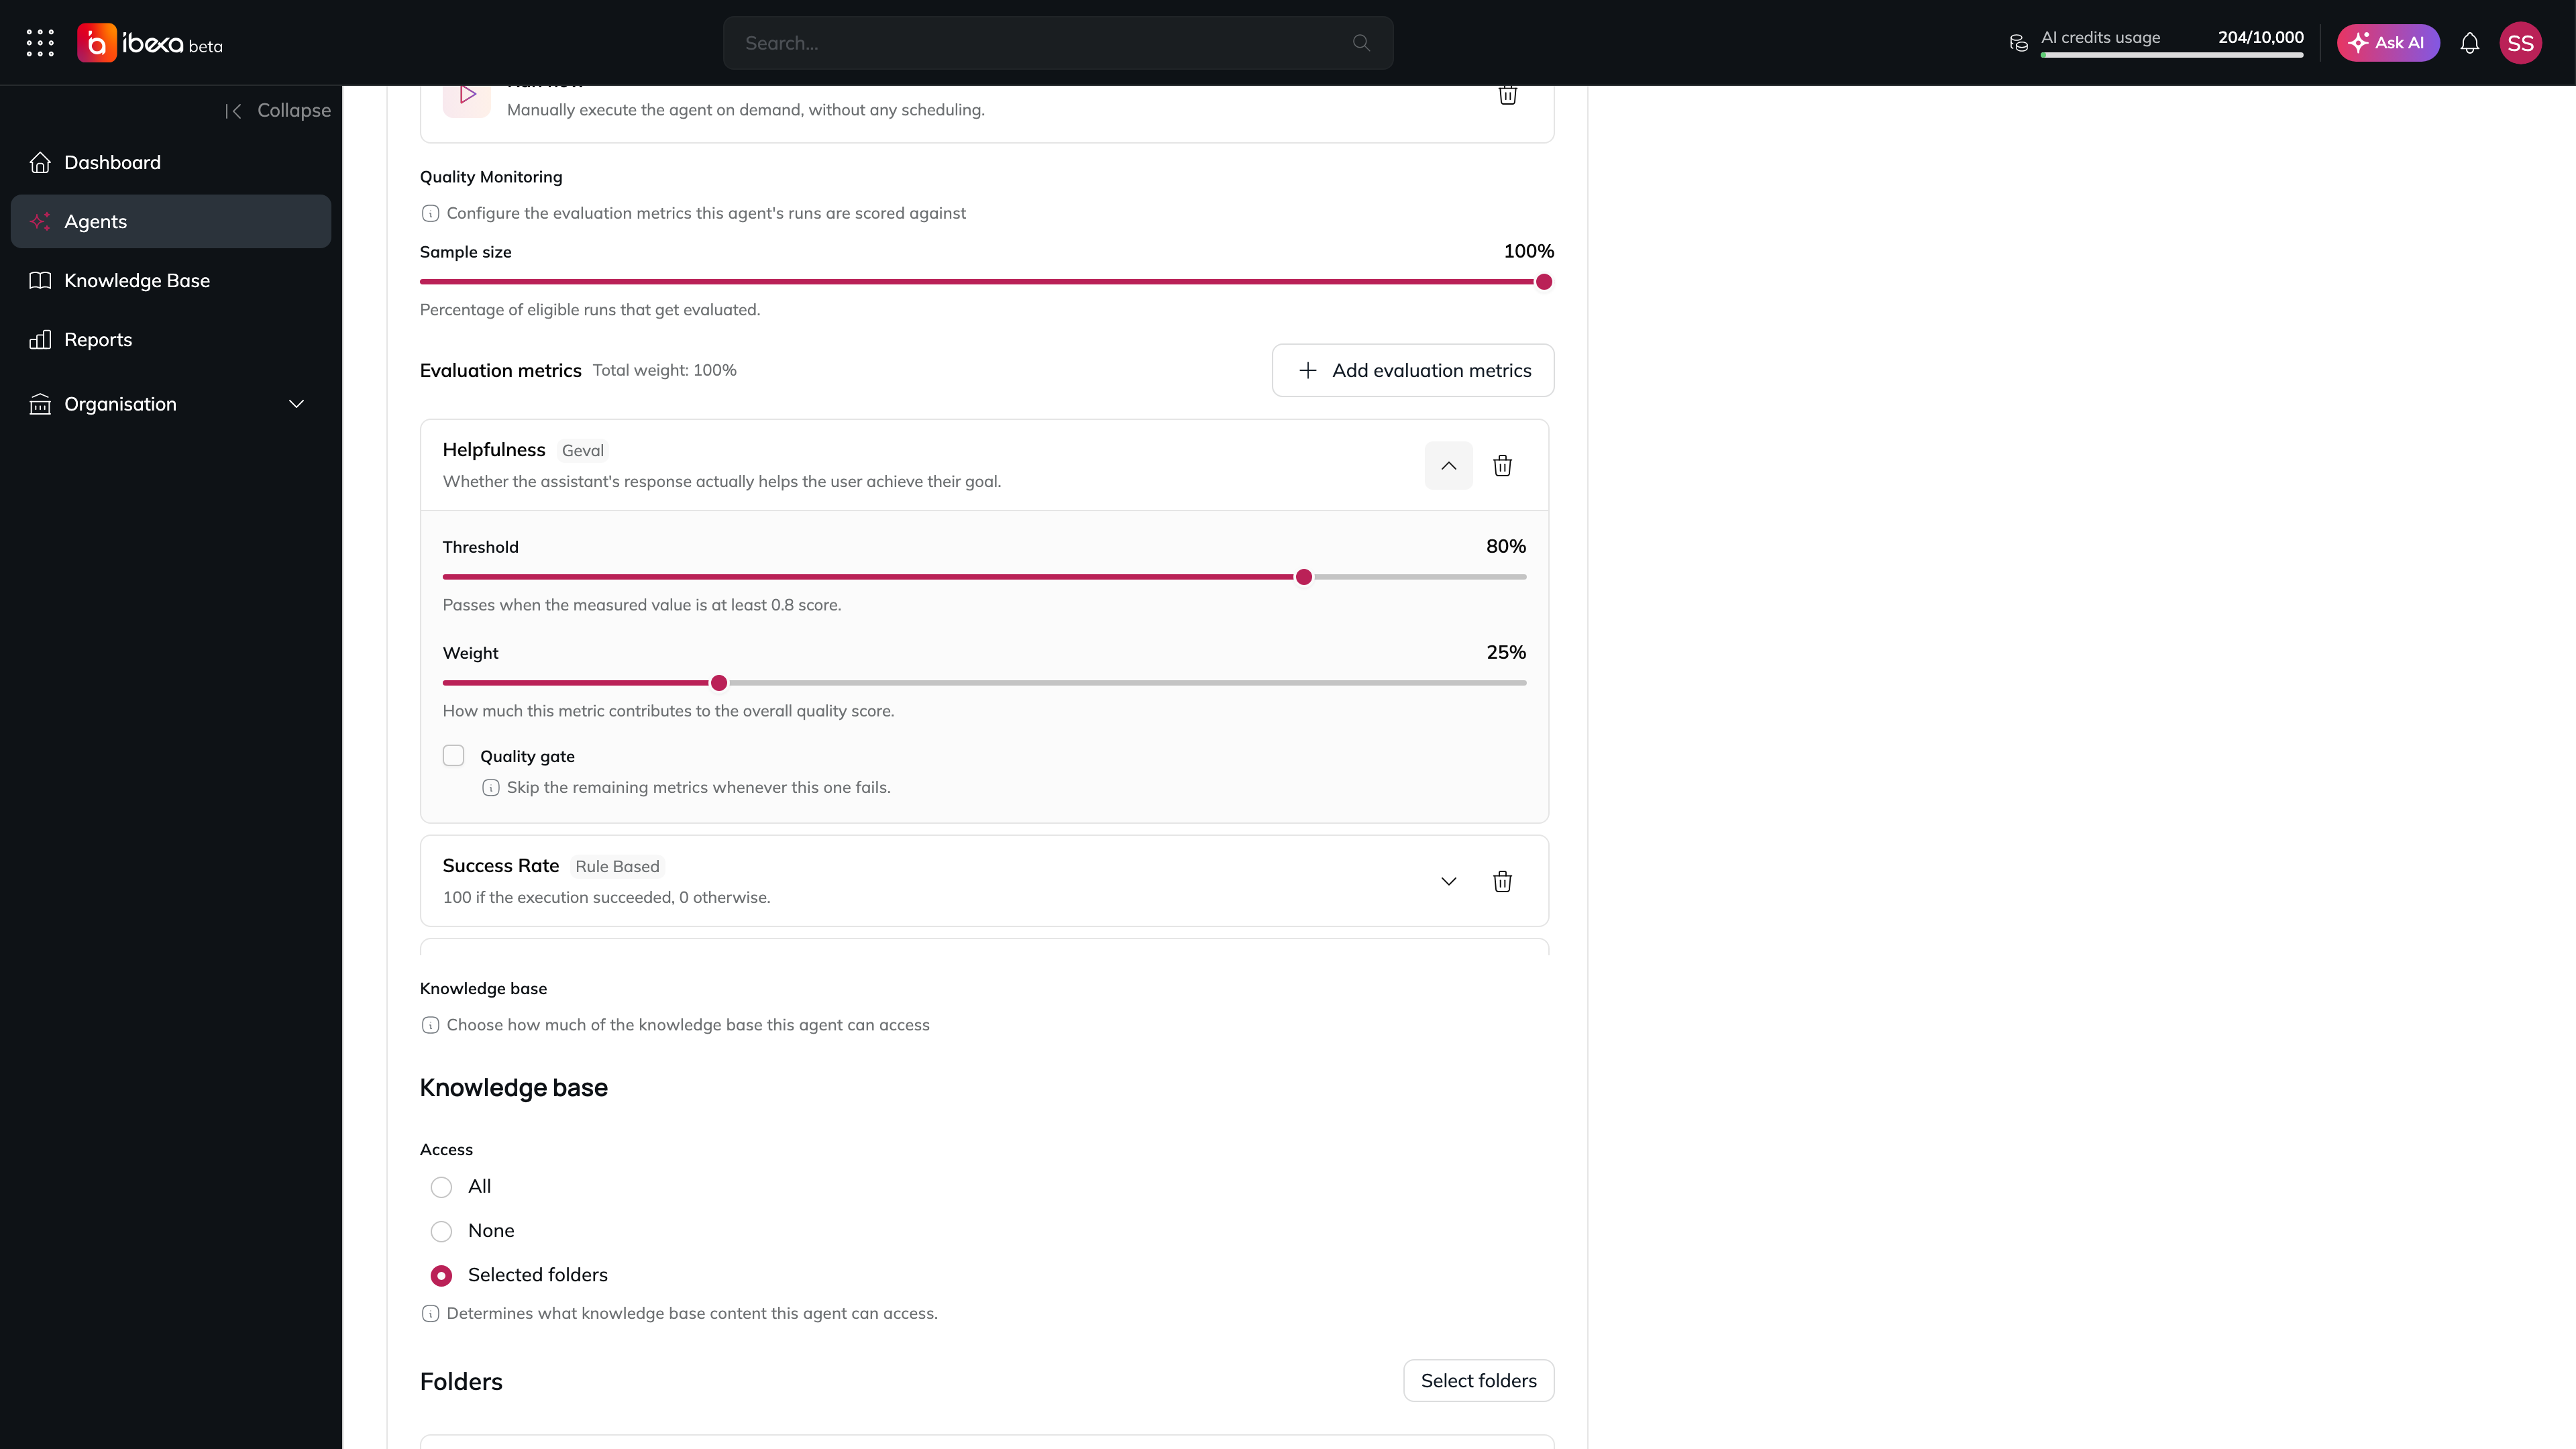
The Edit Agent page includes a **Quality Monitoring** section where you can define which quality metrics are automatically evaluated on this agent's runs - the same configuration available as [Step 5: Quality Metrics](#step-5-quality-metrics) when creating the agent, plus the **Sample size** slider described below. This is a separate, more advanced configuration than the [Impact Metric](#step-6-general-properties) - Impact Metric measures business value, while Quality Monitoring measures how well the agent is actually performing.

1. In the Quality Monitoring section, select **Add metric** to open the metric catalog, grouped by evaluation method (e.g. **Rule Based**, **GEval**).
2. Select one or more metrics to add. Available metrics include:

   * **Rule-based** (computed directly from execution data): **Success Rate**, **Latency**, **Cost**, **Latency to First Token**.
   * **GEval** (LLM-as-judge, scored against a rubric): **Correctness**, **Safety**, **Helpfulness**, **Harmfulness**, **Task Success**, **Tool Correctness**, **Groundedness**, **Citation Accuracy**, **Completeness**, **Coherence**, **Relevance**, **Hallucination**, **Toxicity**, **PII Leakage**, **Prompt Rage**.

   See the [Quality Metrics](/manual/agents/quality-metrics-reference.md) for what each metric measures, its unit, and its direction (higher vs. lower is better).
3. For each added metric, configure:
   * **Threshold** - the value the metric must reach to count as "passed" (in the metric's own unit, e.g. 80 for an 80% success rate, or 5 for a 5-second latency cap).
   * **Weight** - how much this metric contributes to the run's overall quality score. Weights across all metrics must add up to 100%.
   * **Quality gate** - when checked, a failure on this metric skips evaluating the remaining metrics for that run.
4. Use the **Sample size** slider to set what percentage of eligible runs are actually evaluated (0-100%, default: 100%). Evaluating less than 100% reduces cost when you don't need every run scored.
5. Select **Submit** to save. Leaving the section empty (no metrics added) disables quality monitoring for the agent - its **Quality** tab will show an empty state instead of results.

<figure><img src="https://3641047820-files.gitbook.io/~/files/v0/b/gitbook-x-prod.appspot.com/o/spaces%2Fzi8TZ3KjOFqUxK0zOIrL%2Fuploads%2Fgit-blob-602e81efc434a1ffdbc324098065278f0632de3d%2Fagent-edit-quality-monitoring.png?alt=media" alt="The Quality Monitoring section of the Edit Agent page with the Sample size slider at 100%, the Add evaluation metrics button, and the Helpfulness metric card expanded to show its Threshold and Weight sliders and the Quality gate checkbox, above a collapsed Success Rate card"><figcaption><p>Quality Monitoring on the Edit Agent page</p></figcaption></figure>

> **Note:** Of the available evaluation methods, only **Rule Based** and **GEval** currently compute real scores. Other method types may appear as reserved for future use and are not yet functional.

## Viewing Quality Results

Once Quality Monitoring is configured, the agent's **Quality** tab (see [Viewing an Agent](#viewing-an-agent)) shows:

* An **overall quality score** with its trend over time, plus counts of passed, failed, and not-yet-evaluated runs.
* A **per-metric breakdown**, showing each configured metric's average value over time.
* Filters to narrow results by date range, time grouping (day/month/year/total), and target type (single execution, individual message, or whole conversation).

> **Note:** Quality analytics (the Quality tab, and its underlying data) require platform administration role (Owner or Administrator).

## Deleting an Agent

> ⚠️ **This action is permanent and cannot be undone.**

1. Open the agent's detail page (or locate it in the Agents list).
2. Select **Delete** from the actions area (or the overflow **"…"** menu).
3. Select **Delete** to confirm, or **Cancel** to go back. After deletion you are returned to the Agents page.

## Troubleshooting

| Issue                                                                                      | What to do                                                                                                                                     |
| ------------------------------------------------------------------------------------------ | ---------------------------------------------------------------------------------------------------------------------------------------------- |
| **Agents** is not visible in the main menu                                                 | Contact your organisation owner - your account may not have access.                                                                            |
| The **Add Agent** button is not visible                                                    | Contact your organisation owner - your account may not have access to the Agents page.                                                         |
| The AI-assisted setup dialog shows *"Failed to generate agent definition recommendations"* | The AI suggestion service encountered an error. Select **Configure manually** to proceed without suggestions.                                  |
| The **Submit** button stays inactive                                                       | Ensure all required fields are filled in on every step. Required fields are marked with an asterisk (\*).                                      |
| An agent shows as **Disabled**                                                             | The agent was created with the Enabled checkbox unchecked, or was later disabled via Edit. Open the agent and select **Edit** to re-enable it. |
| The **Run test** page shows a loading error                                                | Check your internet connection and refresh the page. If the problem persists, contact your platform administrator.                             |
| No agents match your search or category filter in the Agents Browser                       | Adjust or clear your search and filters, or select **Add Custom Agent** to build an agent from scratch instead.                                |