> For the complete documentation index, see [llms.txt](https://docs.ibexa.ai/llms.txt). Markdown versions of documentation pages are available by appending `.md` to page URLs; this page is available as [Markdown](https://docs.ibexa.ai/tutorials/building-an-agent-that-reacts-to-third-party-events.md).

# Building an Agent That Reacts to Third-Party Events

Build an agent that reacts autonomously to events from a third-party application via a Webhook trigger, using a forms.app post-event satisfaction survey feeding a live Report as a worked example.

| **Time to complete** | \~30 minutes                                                                                                                                                                          |
| -------------------- | ------------------------------------------------------------------------------------------------------------------------------------------------------------------------------------- |
| **Who this is for**  | Marketing team members and Content Editors who want an agent to act autonomously whenever a third-party application (a CRM, a form service, another internal tool) sends it an event. |

## What You Will Build

Many useful agents don't wait for a person to start a chat - they react the moment something happens in another system: a form gets submitted, an order comes in, a support ticket is raised. This tutorial builds that pattern end to end using a **Webhook** trigger, with a concrete worked example: a **Post-Event Satisfaction Analytics Agent** for the Ibexa Summit.

Attendees fill in a short **forms.app** survey after the event; every submission is delivered to the agent through the webhook, and the agent autonomously keeps a single live **Report** up to date - no manual copy-pasting, and no duplicate reports created run after run. Once you understand the pattern, you can repeat the same approach with any third-party application capable of sending a webhook: a support desk raising tickets, a CRM logging deals, an e-commerce platform confirming orders, and so on.

The finished report from the worked example contains:

* A **Metric** block with the average satisfaction score across all responses so far.
* A **Pie chart** showing the distribution of scores (1-5).
* A **Data table** with one row per response: attendee name, session attended, score, and comment.
* An **Action Items** block that the agent fills in automatically whenever a response scores 2 or lower, so the marketing team knows who to follow up with.

{% hint style="info" %}
**forms.app is just an example.** Any survey/form tool that can send a webhook on submission works the same way - for instance **Typeform**, **Google Forms** (via Zapier/Make or Apps Script), **Jotform**, or **Microsoft Forms**. Swap out Step 1 and Step 3 for your tool of choice; the Agent Definition in Step 2 does not change, since it only depends on the webhook payload shape, not on which form builder sent it.
{% endhint %}

## Why a Webhook Trigger Needs a "Find-or-Create" Pattern

Each time the third-party application sends an event, the platform starts a **brand-new agent execution** - the agent has no memory of previous runs. Left unhandled, this would mean a new report gets created for every single event received, instead of one report being kept current.

To avoid that, the agent always searches for its report by a **fixed, predictable title** first:

1. Search for a report titled *"Ibexa Summit - Post-Event Satisfaction"*.
2. If none is found, create it (first event).
3. If one is found, read its current blocks and update them with the new event's data (every following event).

This "search-then-create-or-update" pattern is what lets a stateless, webhook-triggered agent maintain one continuously updated report, without needing any external storage to remember the report's ID between runs - and it applies just as well to any other autonomous, event-driven agent you build later.

## Prerequisites

Before you start, make sure the following are in place:

* At least one **AI model** has been connected and enabled. Go to **Organisation → AI Models** and confirm a model is listed. If none is available, ask your administrator.
* The built-in **Reports MCP Server** is available in your organisation. Go to **Organisation → MCP Servers** and confirm a server named **Reports** appears in the list. If it is missing, ask your administrator - see [Reports MCP Server](/manual/organisation/built-in-mcp-servers/reports-mcp-server.md).
* A free [forms.app](https://forms.app/) account, or one you can create in Step 1 below.

## Overview of the Steps

1. Create the "Post-event satisfaction" survey form in forms.app - the third-party application that will send the events.
2. Create the Agent Definition, with its Instructions and the Reports MCP Server tools, and add a Webhook trigger.
3. Configure the webhook on the forms.app side.
4. Test the agent end-to-end.

## Step 1: Create the "Post-Event Satisfaction" Survey Form

### 1.1 - Register a forms.app account (if you don't have one)

1. Go to <https://forms.app/>.
2. Select **Sign up** and register with your email address or a Google/Microsoft account.
3. Verify your email if prompted.

### 1.2 - Build the survey form

1. From the forms.app dashboard, select **Create form** → **Start from scratch**.
2. Name the form **Post-Event Satisfaction - Ibexa Summit**.
3. Add the following fields, in order:

| Field                      | Type                         | Required                               |
| -------------------------- | ---------------------------- | -------------------------------------- |
| **Attendee name**          | Short text                   | No (attendees may respond anonymously) |
| **Session/track attended** | Short text or dropdown       | Yes                                    |
| **Satisfaction score**     | Rating / opinion scale (1-5) | Yes                                    |
| **Comment**                | Long text / paragraph        | No                                     |

4. Select **Save**.

> Keep the field labels simple and memorable - the agent's instructions reference them by these human-facing names, so the webhook payload's field values should be easy to match back to them once you see a real submission in Step 3.

## Step 2: Create the Agent Definition

### 2.1 - Open the Add Agent page

Select **Agents** in the main navigation menu, then **Add Agent**. Choose **Add Custom Agent** to start from a blank page.

### 2.2 - Step 1 of 6: Instructions

Paste the following into the **Instructions** field:

```
## Role & Objective

You are the Post-Event Satisfaction Analytics Agent for the Ibexa Summit. You are triggered by a webhook every time someone submits the "Post-event satisfaction" form. Your job is to keep a single live Report up to date with all responses received so far - never create more than one report for this survey.

Report title (fixed, always use exactly this): "Ibexa Summit - Post-Event Satisfaction"

## Expected Webhook Payload

Each run receives one form submission with (at least) these fields:
- Attendee name (optional, may be blank/anonymous)
- Session/track attended
- Satisfaction score (integer, 1-5)
- Comment (optional free text)

## Workflow

On every run, follow these steps in order:

1. Search for an existing report by the exact title above.
2. If no report is found, create one and add:
   - a Metric block showing the average satisfaction score
   - a Pie chart block showing the distribution of scores (1-5)
   - a Data table block with one row per response: name, session attended, score, comment
   - an Action Items block (initially empty)
3. If a report is found, read its current blocks first so you know what already exists and their IDs - never add duplicate blocks.
4. Append the new response as a row in the Data table block.
5. Recalculate and update the Metric block (average score) and the Pie chart block (score distribution) using all responses so far, including this one.
6. If the satisfaction score is 2 or lower, add an Action Item to the Action Items block asking the marketing team to follow up with the attendee (include name if provided, session, and comment). Do not add an action item for scores above 2.
7. Never create a second report for this survey - always update the one found in step 1.

## Output

After updating the report, respond with a short confirmation including the report URL and whether an action item was added.
```

Select **Next**.

### 2.3 - Step 2 of 6: Triggers - Add the Webhook

1. Select **Add trigger** and choose **Webhook**.
2. Fill in the trigger settings:

| Field                     | Value                                                                                                       |
| ------------------------- | ----------------------------------------------------------------------------------------------------------- |
| **Token**                 | A long, random, URL-safe string (30-50 characters) - this becomes part of the webhook URL.                  |
| **Signature required**    | **Off** - forms.app's webhook integration does not document HMAC request signing, so this cannot be used.   |
| **IP allowlist**          | Leave empty, unless you can find and enter forms.app's outbound IP ranges.                                  |
| **Rate limit per minute** | Leave at the default (60) - a single survey will not come close to this.                                    |
| **Message filter**        | Leave empty - this webhook token is dedicated to this one form, so every request should start an execution. |

3. Select **Next**.

> **Security note:** With **Signature required** off, the secret **token** embedded in the webhook URL is the only thing protecting this endpoint - keep the full URL private and treat it like a password.

4. Copy the resulting webhook URL (`https://api.ibexa.ai/api/v1/webhooks/<token>`) - you will need it in Step 3.

### 2.4 - Step 3 of 6: Tools - Add the Reports MCP Server

1. Select **Select tools**.
2. Find **IAMP Reports** in the server list.
3. Select the server to expand its tool list, then tick:

| **Tool**                 | **What the agent uses it for**                                                |
| ------------------------ | ----------------------------------------------------------------------------- |
| `search_reports`         | Checks whether the report already exists, by title                            |
| `create_report`          | Creates the report on the first submission                                    |
| `get_report_blocks`      | Reads existing blocks before updating them, to avoid duplicates               |
| `add_block`              | Adds each block (metric, chart, table, action items) on the first submission  |
| `update_block`           | Updates the metric, chart, table, and action items blocks on every submission |
| `update_report_metadata` | Sets the report title on creation                                             |
| `calculate`              | Recomputes the running average score and score distribution                   |
| `get_report_url`         | Returns the direct link to share in the confirmation message                  |

Confirm the selection and return to the wizard. Select **Next**.

### 2.5 - Step 4 of 6: Knowledge Base

| Field      | What to select                                                                   |
| ---------- | -------------------------------------------------------------------------------- |
| **Access** | **None** - this agent only needs the webhook payload and the Reports MCP Server. |

Select **Next**.

### 2.6 - Step 5 of 6: Quality Metrics

Leave this step empty for now - you can configure quality monitoring later from the agent's **Edit** page. Select **Next**.

### 2.7 - Step 6 of 6: General Properties

| Field                       | What to enter                                                                                                  |
| --------------------------- | -------------------------------------------------------------------------------------------------------------- |
| **Name**                    | `Post-Event Satisfaction Analytics Agent`                                                                      |
| **Description**             | `Keeps a live satisfaction report up to date from Ibexa Summit survey webhook submissions.`                    |
| **Model**                   | Choose the AI model your organisation has configured.                                                          |
| **Maximum number of steps** | Leave at the default, or raise it slightly (e.g. 30) to be safe on later submissions once the table has grown. |
| **Can be sub-agent**        | Leave unchecked                                                                                                |

Select **Submit**. You are taken to the new agent's detail page.

## Step 3: Configure the Webhook on the forms.app Side

1. In forms.app, open the **Post-Event Satisfaction - Ibexa Summit** form.
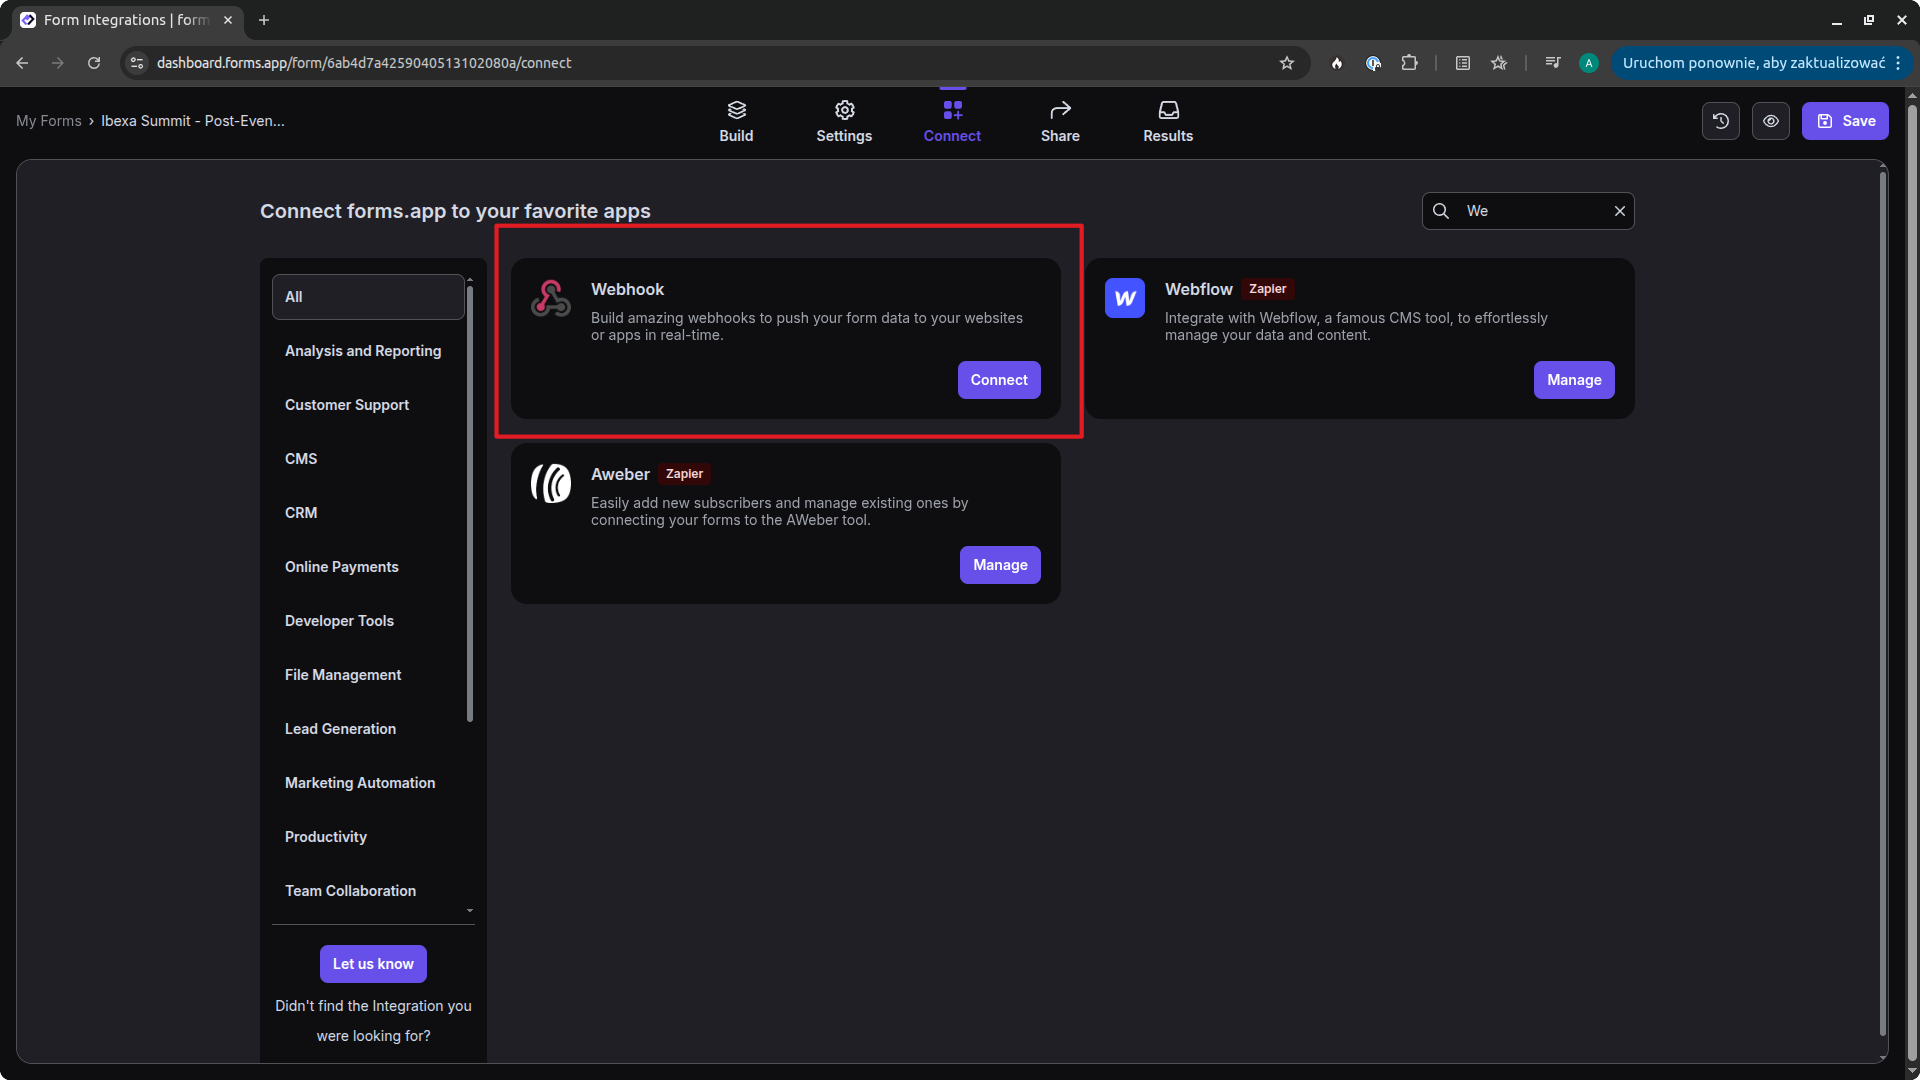
2. Go to the **Connect** tab (top navigation), then select **Connect** on the **Webhook** integration card.

<figure><img src="https://3641047820-files.gitbook.io/~/files/v0/b/gitbook-x-prod.appspot.com/o/spaces%2Fzi8TZ3KjOFqUxK0zOIrL%2Fuploads%2Fgit-blob-fa2404aa666e66192678f25a3850ec6282836bde%2Fforms-app-webhook.png?alt=media" alt="The forms.app Connect tab, showing the Webhook integration card highlighted with a Connect button"><figcaption><p>The Connect tab in forms.app, where you enable the Webhook integration.</p></figcaption></figure>

3. Paste the webhook URL you copied in Step 2.3.
4. Save the integration. forms.app will call this URL every time the form is submitted.

## Step 4: Test the Agent

### 4.1 - Submit a first test response

Open your published form and submit a test response with a **high** score (e.g. 5) and a short comment.

* Wait a few moments, then open **Reports** in the main navigation menu.
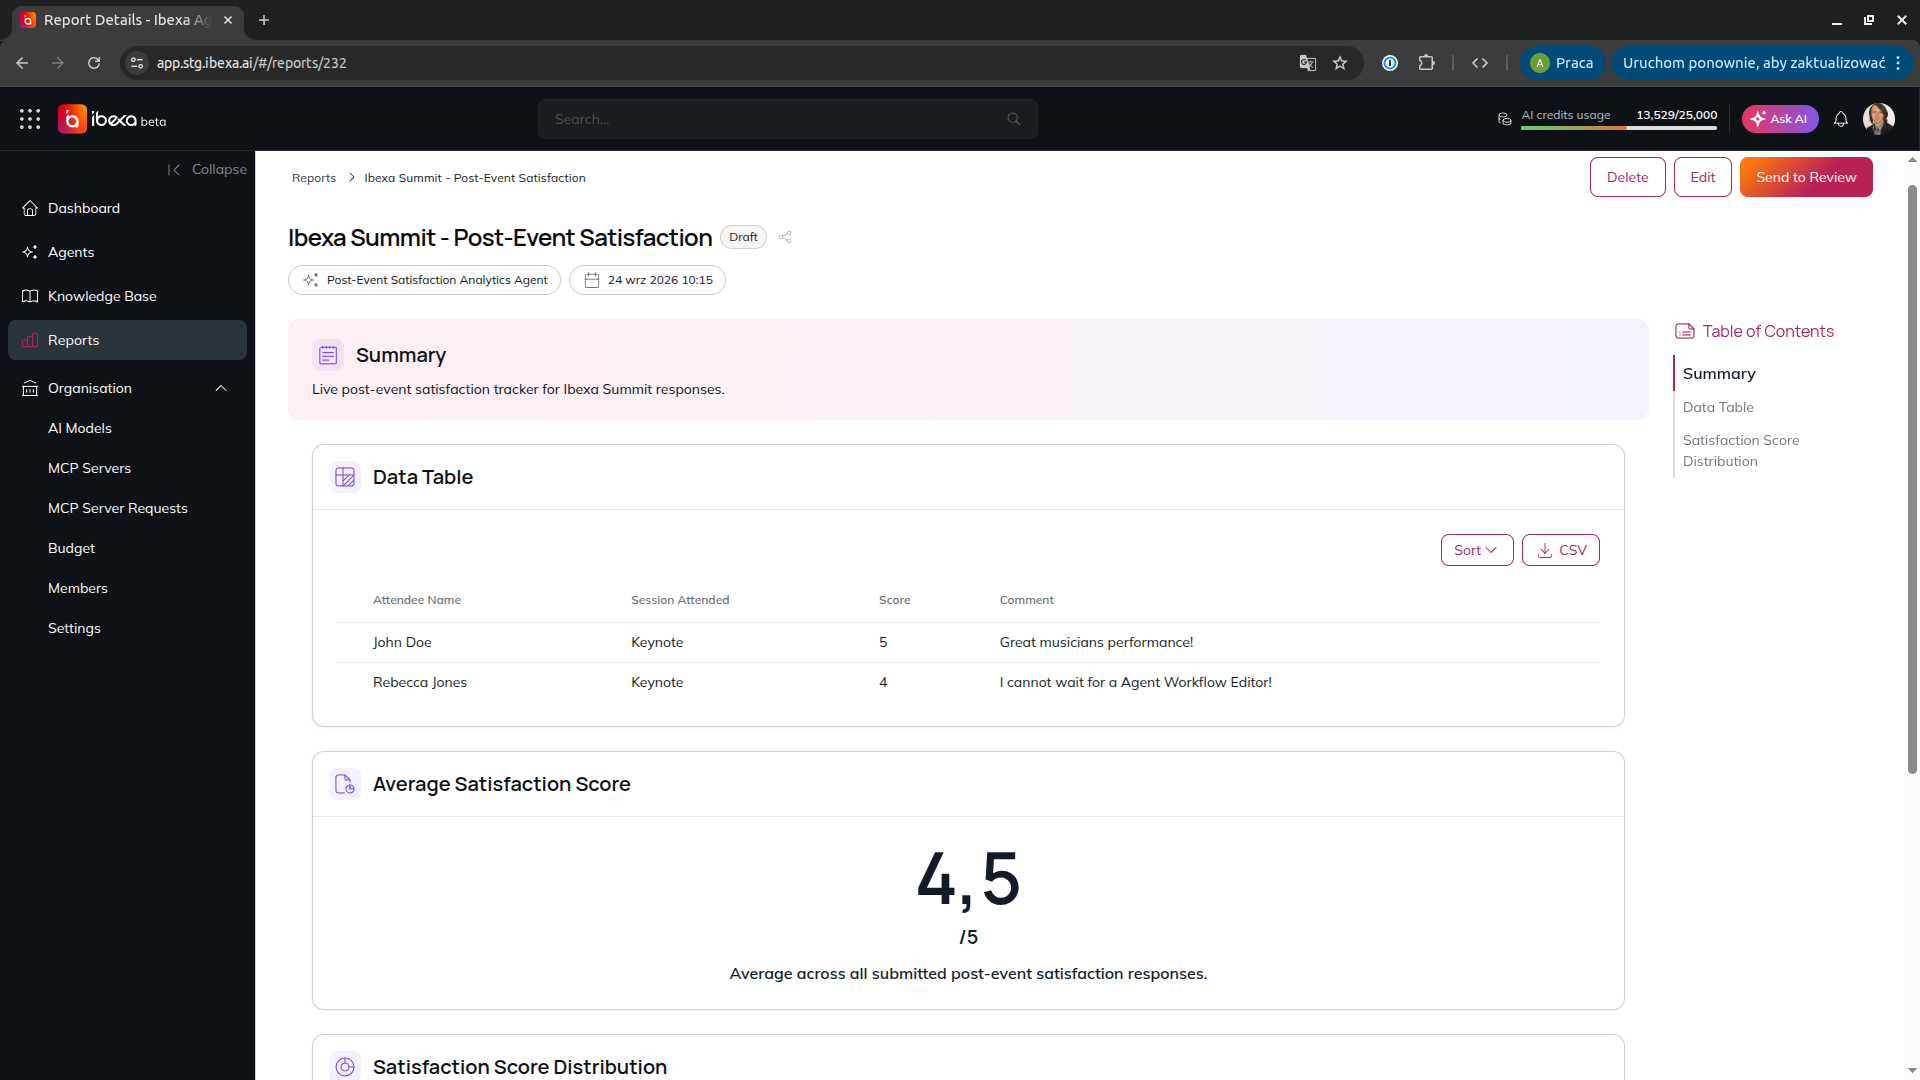
* Confirm a new report titled **Ibexa Summit - Post-Event Satisfaction** now exists, with the Metric, Pie chart, Data table, and Action Items blocks all present, and one row in the table.

### 4.2 - Submit a second test response with a low score

Submit another test response, this time with a **low** score (e.g. 2 or 1) and a comment.

* Reopen the report. Confirm:
  * The **same** report was updated - no second report was created.
  * The Data table now has **two** rows.
  * The Metric block's average score has been recalculated.
  * The Pie chart reflects both scores.
  * The Action Items block now has one new entry referencing the low-scoring response.

<figure><img src="https://3641047820-files.gitbook.io/~/files/v0/b/gitbook-x-prod.appspot.com/o/spaces%2Fzi8TZ3KjOFqUxK0zOIrL%2Fuploads%2Fgit-blob-e6f63b13e400d53c3fb1a07b12dd970e8b72f40a%2Fwebhook-tutorial-final-result.png?alt=media" alt="The Ibexa Summit - Post-Event Satisfaction report, showing the Data Table with attendee responses and the Average Satisfaction Score metric block"><figcaption><p>The report kept up to date by the agent, with one row added per webhook submission and the average score recalculated automatically.</p></figcaption></figure>

### 4.3 - Submit a few more responses

Repeat with a handful of additional test responses (mixing scores, with and without an attendee name and comment) to confirm the report keeps accumulating rows correctly without duplication.

## Troubleshooting

| **Symptom**                                                            | **Likely cause**                                                                | **Fix**                                                                                                          |
| ---------------------------------------------------------------------- | ------------------------------------------------------------------------------- | ---------------------------------------------------------------------------------------------------------------- |
| A new report is created on every submission                            | The agent isn't finding the existing report, or the title doesn't match exactly | Confirm the instructions use the exact same title string every time, and that the report search tool is enabled. |
| Webhook calls return `401 Unauthorized`                                | **Signature required** was left on, but forms.app cannot sign requests          | Edit the trigger and set **Signature required** to **Off**, as described in Step 2.3.                            |
| Webhook calls return `429 Too Many Requests`                           | Rate limit exceeded (unlikely for a single survey)                              | Increase **Rate limit per minute** on the trigger.                                                               |
| A submission succeeds in forms.app but nothing happens in the platform | The webhook URL was mistyped, or **Message filter** is rejecting the payload    | Re-check the URL pasted in forms.app, and confirm **Message filter** is empty on the trigger.                    |
| The Action Items block never gets an entry                             | Test submissions all used scores above 2                                        | Submit a test response with a score of 2 or lower, as in Step 4.2.                                               |
| Agent fails at a Reports tool call                                     | Not all required Reports MCP Server tools were enabled                          | Edit the agent, go to the Tools step, and confirm every tool listed in Step 2.4 is ticked.                       |

## Summary

You have built an agent that autonomously reacts to events from a third-party application. Here's what you did:

1. ✅ Set up a third-party application (forms.app) to act as the event source, with a short satisfaction survey.
2. ✅ Created an agent whose instructions implement a search-then-create-or-update workflow, so a stateless, webhook-triggered execution never duplicates its output - a pattern that applies to any event source, not just forms.app.
3. ✅ Connected the agent to the Reports MCP Server and added a Webhook trigger with signature checking off (a forms.app limitation) and the secret token as the endpoint's protection.
4. ✅ Wired the webhook URL into the third-party application's own integration settings.
5. ✅ Verified that repeated events update one single report - including automatic Action Items for low scores - rather than creating a new one each time.

## Next Steps

* **Point the same pattern at a different event source** - any third-party application that can send a webhook (a support desk, a CRM, an e-commerce platform) can drive an agent the same way; swap out the form for that system's own webhook configuration.
* **Reuse the pattern for other events on the same source** - duplicate this agent, change the fixed report title and the webhook token, and point a new form at it.
* **Add a Slack notification** - extend the instructions (and tools, if a Slack MCP Server is available) to post a message whenever a new Action Item is added, so the marketing team is alerted in real time.
* **Add an NPS variant** - adapt the form and instructions to collect a Net Promoter Score question instead of (or alongside) the satisfaction rating, and add a matching block to the report.